3 - Dubbo x Spring Boot 开发微服务应用
目标
从零开始基于 Dubbo x Spring Boot 开发微服务,并了解 Dubbo x Spring Boot 的配置方法。
难度
低
环境要求
系统:Windows、Linux、MacOS
JDK 8 及以上(推荐 JDK17)
Git
IntelliJ IDEA(可选)
Docker(可选)
项目介绍
在本任务中,将分为三个子模块进行独立开发,模拟生产环境中的部署架构。
.//apache/dubbo-samples/1-basic/dubbo-samples-spring-boot
├── dubbo-samples-spring-boot-interface // shared API module
├── dubbo-samples-spring-boot-consumer // consumer module
└── dubbo-samples-spring-boot-provider // server module
如上图所示,总共 3 个模块,其中 interface 模块被 consumer 和 provider 模块共同依赖,存放 RPC 通信使用的 API 接口。
.//apache/dubbo-samples/1-basic/dubbo-samples-spring-boot
├── dubbo-samples-spring-boot-interface // shared API module
│ ├── pom.xml
│ └── src
│ └── main
│ └── java
│ └── org
│ └── apache
│ └── dubbo
│ └── springboot
│ └── demo
│ └── DemoService.java // API interface
├── dubbo-samples-spring-boot-consumer // consumer module
│ ├── pom.xml
│ └── src
│ ├── main
│ │ ├── java
│ │ │ └── org
│ │ │ └── apache
│ │ │ └── dubbo
│ │ │ └── springboot
│ │ │ └── demo
│ │ │ └── consumer
│ │ │ ├── ConsumerApplication.java // consumer startup class
│ │ │ └── Task.java // The consumer simulates calling tasks
│ │ └── resources
│ │ └── application.yml // Spring Boot configuration file
├── dubbo-samples-spring-boot-provider // server module
│ ├── pom.xml
│ └── src
│ └── main
│ ├── java
│ │ └── org
│ │ └── apache
│ │ └── dubbo
│ │ └── springboot
│ │ └── demo
│ │ └── provider
│ │ ├── DemoServiceImpl.java // server implementation class
│ │ └── ProviderApplication.java // server startup class
│ └── resources
│ └── application.yml // Spring Boot configuration file
└── pom.xml
以上是本教程将使用的项目的文件夹结构。
快速部署(直接基于 Samples 启动)
本章将手把手教你通过几个简单的命令部署并运行一个基于 Dubbo x Spring Boot 的用例。
注意:本章部署的代码细节可以在 apache/dubbo-samples 仓库的 1-basic/dubbo-samples-spring-boot 中找到,下一章也会对其进行讲解。
1. 获取测试项目
在开始整个教程之前,我们需要获取测试项目的代码。Dubbo 的所有测试用例代码都存放在 apache/dubbo-samples 仓库中,以下命令可以帮助你获取 Samples 仓库中的所有代码。
git clone --depth=1 --branch master git@github.com:apache/dubbo-samples.git
2. 启动一个简单的注册中心
对于一个微服务应用来说,注册中心是不可或缺的组件。只有通过注册中心,消费者才能成功发现服务端的地址信息,进而发起调用。
为了方便本教程的使用,我们提供了一个基于 Apache Zookeeper 注册中心的简单启动器。如果需要在生产环境中部署注册中心,请参考 生产环境初始化 部署高可用的注册中心。
Windows:
./mvnw.cmd clean compile exec:java -pl tools/embedded-zookeeper

Linux / MacOS:
./mvnw clean compile exec:java -pl tools/embedded-zookeeper

Docker:
docker run --name some-zookeeper -p 2181:2181 --restart always -d zookeeper
3. 本地打包 API 模块
为了成功编译服务端和消费端模块,你需要先将 dubbo-samples-spring-boot-interface 模块本地打包安装。
./mvnw clean install -pl 1-basic/dubbo-samples-spring-boot
./mvnw clean install -pl 1-basic/dubbo-samples-spring-boot/dubbo-samples-spring-boot-interface
4. 启动服务提供者
启动注册中心后,下一步就是启动一个对外提供服务的服务提供者。dubbo-samples 中也提供了相应的示例,可以通过以下命令快速拉起。
Windows:
./mvnw.cmd clean compile exec:java -pl 1-basic/dubbo-samples-spring-boot/dubbo-samples-spring-boot-provider "-Dexec.mainClass=org.apache.dubbo.springboot.demo.provider.ProviderApplication"

Linux / MacOS:
./mvnw clean compile exec:java -pl 1-basic/dubbo-samples-spring-boot/dubbo-samples-spring-boot-provider -Dexec.mainClass="org.apache.dubbo.springboot.demo.provider.ProviderApplication"

Note: You need to open an independent terminal to run, and the command will keep executing.
执行完以上命令后,等待一段时间,直到出现以下日志(Current Spring Boot Application is await),表示服务提供者已经启动,说明服务提供者可以对外提供服务了。
2023-02-08 17:13:00.357 INFO 80600 --- [lication.main()] o.a.d.c.d.DefaultApplicationDeployer : [DUBBO] Dubbo Application[1.1](dubbo-springboot-demo-provider) is ready., dubbo version: 3.2 .0-beta.4, current host: 30.221.128.96
2023-02-08 17:13:00.369 INFO 80600 --- [lication.main()] o.a.d.s.d.provider.ProviderApplication : Started ProviderApplication in 9.114 seconds (JVM running for 26.522)
2023-02-08 17:13:00.387 INFO 80600 --- [pool-1-thread-1].b.c.e.AwaitingNonWebApplicationListener : [Dubbo] Current Spring Boot Application is await...
5. 启动服务消费者
最后一步是启动一个服务消费者来调用服务提供者,这是 RPC 调用的核心,为服务消费者调用服务提供者提供桥梁。
Windows:
./mvnw.cmd clean compile exec:java -pl 1-basic/dubbo-samples-spring-boot/dubbo-samples-spring-boot-consumer "-Dexec.mainClass=org.apache.dubbo.springboot.demo.consumer.ConsumerApplication"

Linux / MacOS:
./mvnw clean compile exec:java -pl 1-basic/dubbo-samples-spring-boot/dubbo-samples-spring-boot-consumer -Dexec.mainClass="org.apache.dubbo.springboot.demo.consumer.ConsumerApplication"
执行完以上命令后,等待一段时间,直到出现以下日志(Hello world),打印的数据是服务提供者处理后返回的,标志着一次服务调用成功。
2023-02-08 17:14:33.045 INFO 80740 --- [lication.main()] o.a.d.s.d.consumer.ConsumerApplication : Started ConsumerApplication in 11.052 seconds (JVM running for 31.62)
Receive result ======> Hello world
2023-02-08 17:14:33.146 INFO 80740 --- [pool-1-thread-1].b.c.e.AwaitingNonWebApplicationListener : [Dubbo] Current Spring Boot Application is await...
Wed Feb 08 17:14:34 CST 2023 Receive result ======> Hello world
Wed Feb 08 17:14:35 CST 2023 Receive result ======> Hello world
Wed Feb 08 17:14:36 CST 2023 Receive result ======> Hello world
Wed Feb 08 17:14:37 CST 2023 Receive result ======> Hello world
动手实践(从零代码开发版本)
本章将手把手教你通过一步步的教程从零开始开发一个微服务应用。
1. 启动注册中心
对于一个微服务应用来说,注册中心是不可或缺的组件。只有通过注册中心,消费者才能成功发现服务端的地址信息,进而发起调用。
为了方便本教程的使用,我们提供了一个基于 Apache Zookeeper 注册中心的简单启动器。如果需要在生产环境中部署注册中心,请参考 生产环境初始化 部署高可用的注册中心。
Windows:
git clone --depth=1 --branch master git@github.com:apache/dubbo-samples.git
cd dubbo-samples
./mvnw.cmd clean compile exec:java -pl tools/embedded-zookeeper

Linux / MacOS:
git clone --depth=1 --branch master git@github.com:apache/dubbo-samples.git
cd dubbo-samples
./mvnw clean compile exec:java -pl tools/embedded-zookeeper

Docker:
docker run --name some-zookeeper -p 2181:2181 --restart always -d zookeeper
2. 初始化项目
从本节开始,项目将基于 IntelliJ IDEA 进行构建和测试。
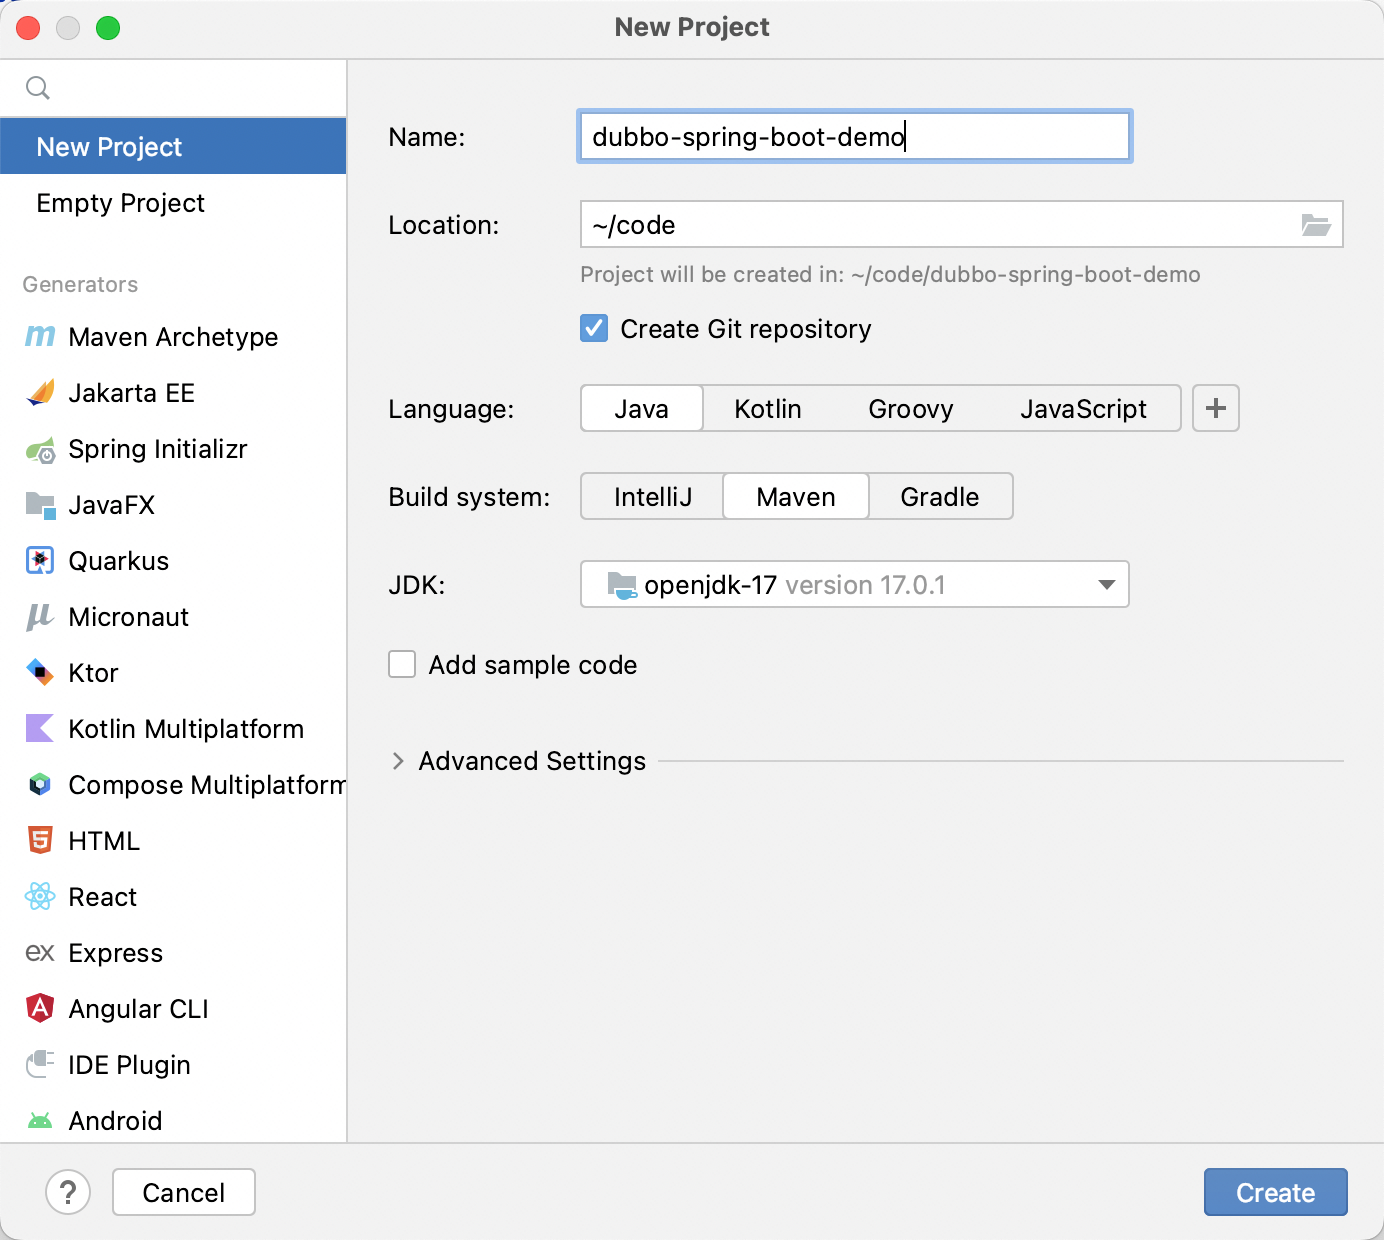
如上图所示,可以构建一个基础项目。
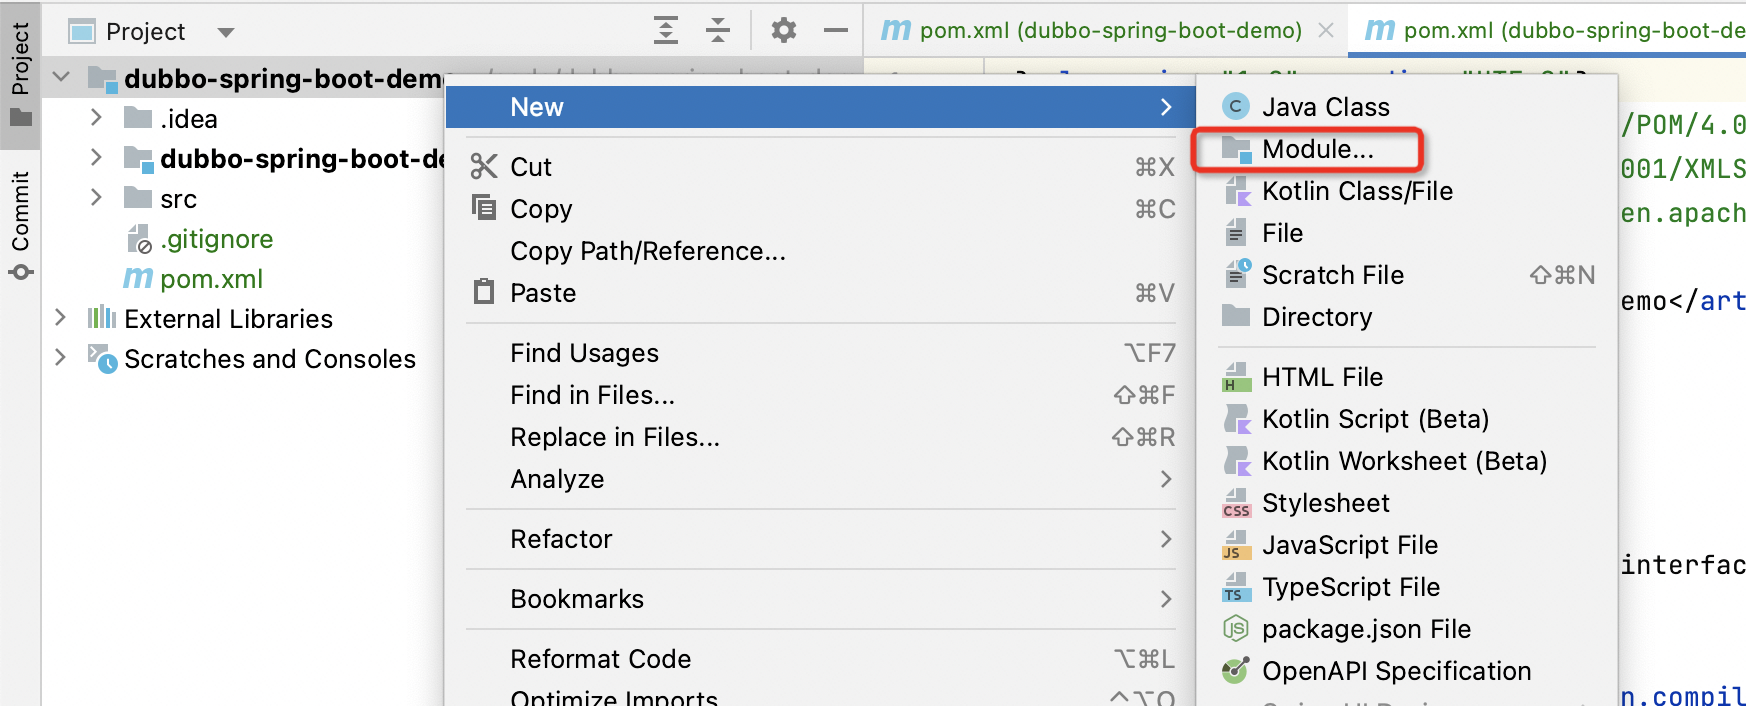
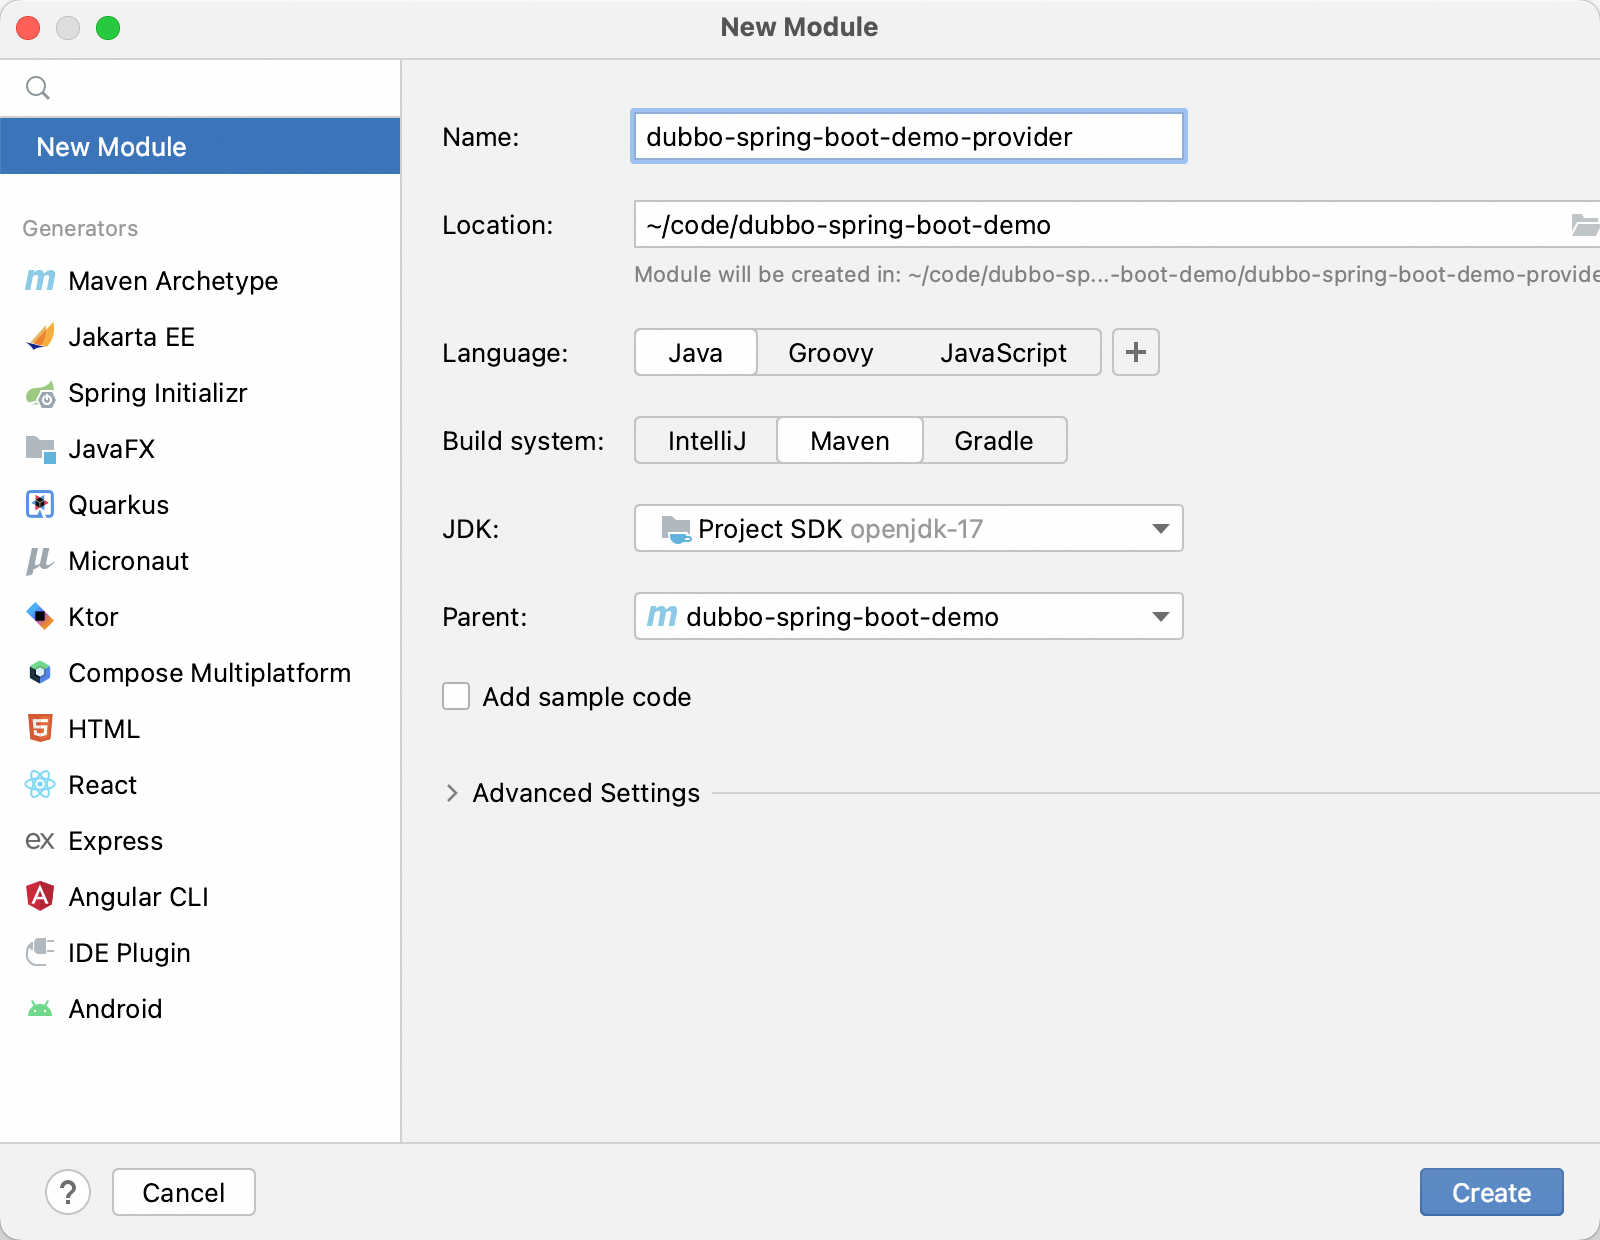
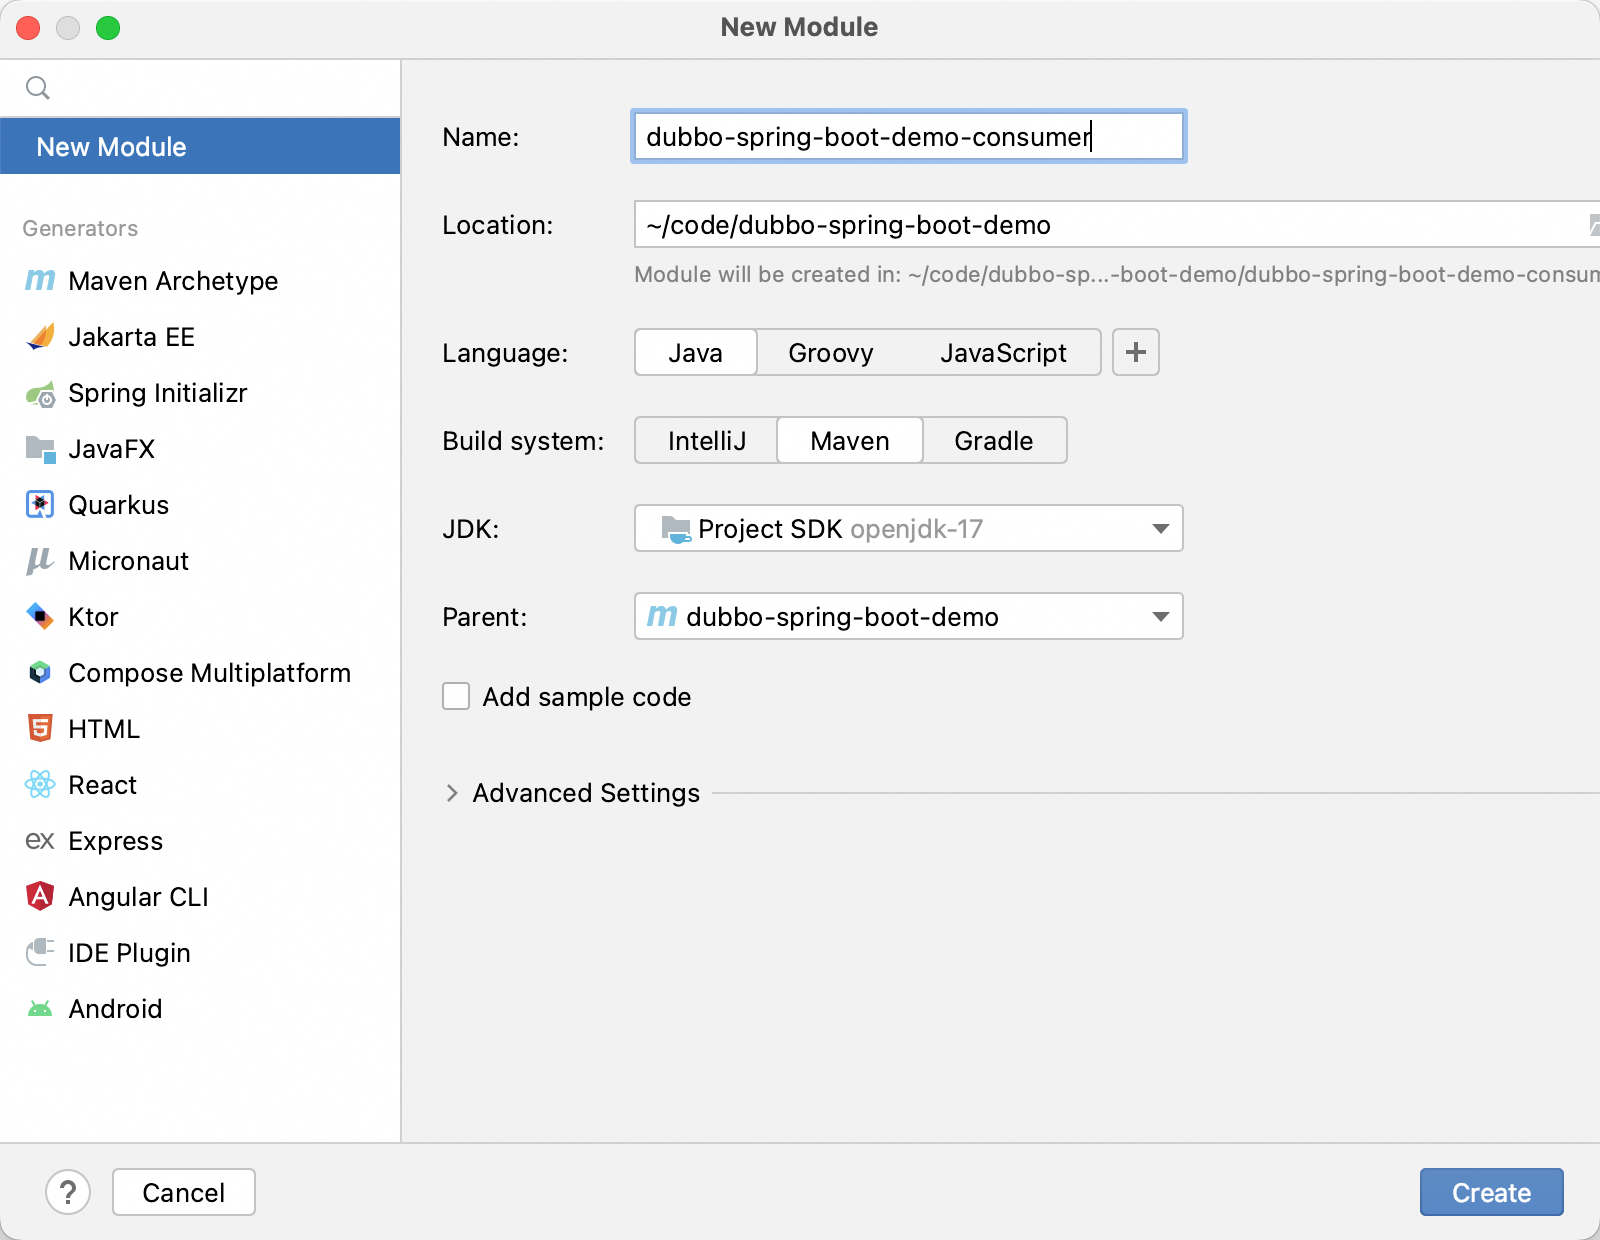
构建好基础项目后,我们需要创建三个子模块 dubbo-spring-boot-demo-interface、dubbo-spring-boot-demo-provider 和 dubbo-spring-boot-demo-consumer。

创建完三个子模块后,你需要创建以下文件夹
在
dubbo-spring-boot-demo-consumer/src/main/java下创建org.apache.dubbo.springboot.demo.consumer包在
dubbo-spring-boot-demo-interface/src/main/java下创建org.apache.dubbo.springboot.demo包在
dubbo-spring-boot-demo-provider/src/main/java下创建org.apache.dubbo.springboot.demo.provider包
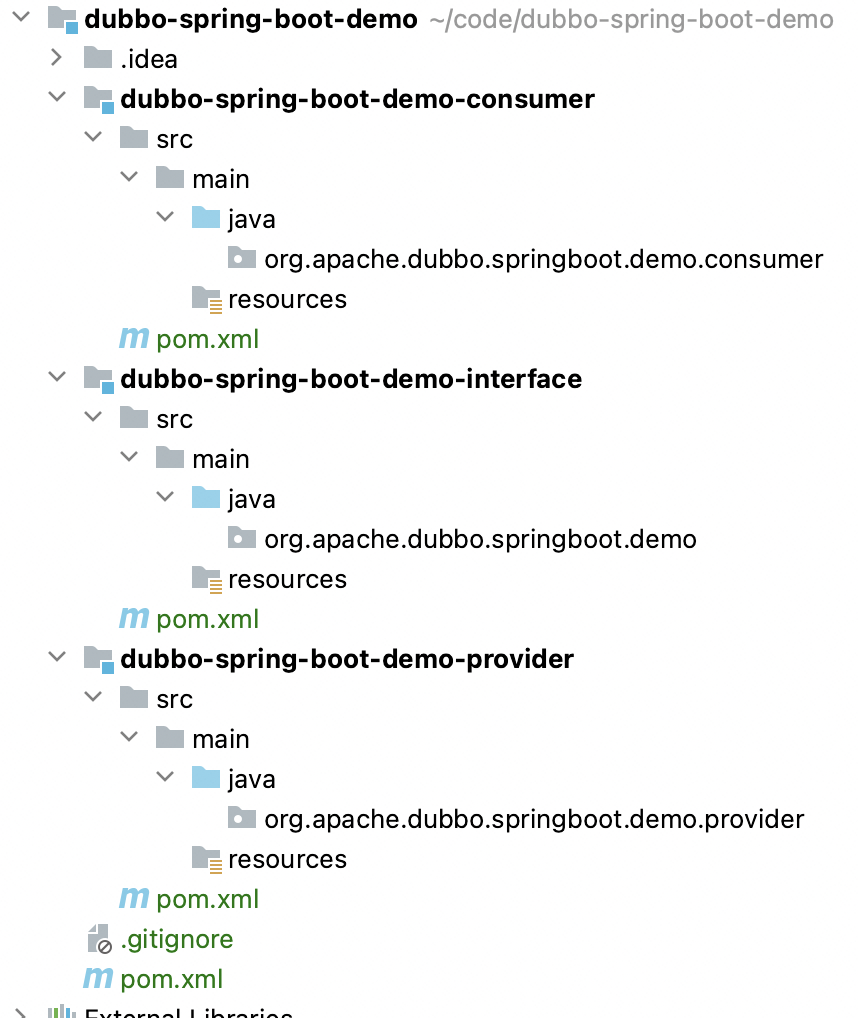
最终的文件夹参考如上图所示。
3. 添加 Maven 依赖
初始化项目后,我们需要先添加 Dubbo 相关的 maven 依赖。
对于多模块项目,你需要先在父项目的 pom.xml 中配置依赖信息。

编辑 ./pom.xml 文件,添加以下配置。
    <properties>
        <dubbo.version>3.2.0-beta.4</dubbo.version>
        <spring-boot.version>2.7.8</spring-boot.version>
        <maven.compiler.source>17</maven.compiler.source>
        <maven.compiler.target>17</maven.compiler.target>
        <project.build.sourceEncoding>UTF-8</project.build.sourceEncoding>
    </properties>

    <dependencyManagement>
        <dependencies>
            <!-- Spring Boot -->
            <dependency>
                <groupId>org.springframework.boot</groupId>
                <artifactId>spring-boot-dependencies</artifactId>
                <version>${spring-boot.version}</version>
                <type>pom</type>
                <scope>import</scope>
            </dependency>

            <!-- Dubbo -->
            <dependency>
                <groupId>org.apache.dubbo</groupId>
                <artifactId>dubbo-bom</artifactId>
                <version>${dubbo.version}</version>
                <type>pom</type>
                <scope>import</scope>
            </dependency>

            <dependency>
                <groupId>org.apache.dubbo</groupId>
                <artifactId>dubbo-dependencies-zookeeper-curator5</artifactId>
                <version>${dubbo.version}</version>
                <type>pom</type>
            </dependency>
        </dependencies>
    </dependencyManagement>


    <build>
        <plugin Management>
            <plugins>
                <plugin>
                    <groupId>org.springframework.boot</groupId>
                    <artifactId>spring-boot-maven-plugin</artifactId>
                    <version>${spring-boot.version}</version>
                </plugin>
            </plugins>
        </pluginManagement>
    </build>
然后在 dubbo-spring-boot-consumer 和 dubbo-spring-boot-provider 两个模块的 pom.xml 中配置具体的依赖。

编辑 ./dubbo-spring-boot-consumer/pom.xml 和 ./dubbo-spring-boot-provider/pom.xml,添加以下配置。
    <dependencies>
        <dependency>
            <groupId>org.apache.dubbo</groupId>
            <artifactId>dubbo-samples-spring-boot-interface</artifactId>
            <version>${project.parent.version}</version>
        </dependency>

        <!-- dubbo -->
        <dependency>
            <groupId>org.apache.dubbo</groupId>
            <artifactId>dubbo-spring-boot-starter</artifactId>
        </dependency>
        <dependency>
            <groupId>org.apache.dubbo</groupId>
            <artifactId>dubbo-dependencies-zookeeper-curator5</artifactId>
            <type>pom</type>
            <exclusions>
                <exclusion>
                    <artifactId>slf4j-reload4j</artifactId>
                    <groupId>org.slf4j</groupId>
                </exclusion>
            </exclusions>
        </dependency>

        <!-- spring boot starter -->
        <dependency>
            <groupId>org.springframework.boot</groupId>
            <artifactId>spring-boot-starter</artifactId>
        </dependency>

    </dependencies>
在这个配置中,定义了 dubbo 和 zookeeper(以及对应的连接器 curator)的依赖。
添加完以上配置后,可以通过 IDEA 的 Maven - Reload All Maven Projects 刷新依赖。
4. 定义服务接口
服务接口是 Dubbo 中消费者和服务端之间的桥梁。
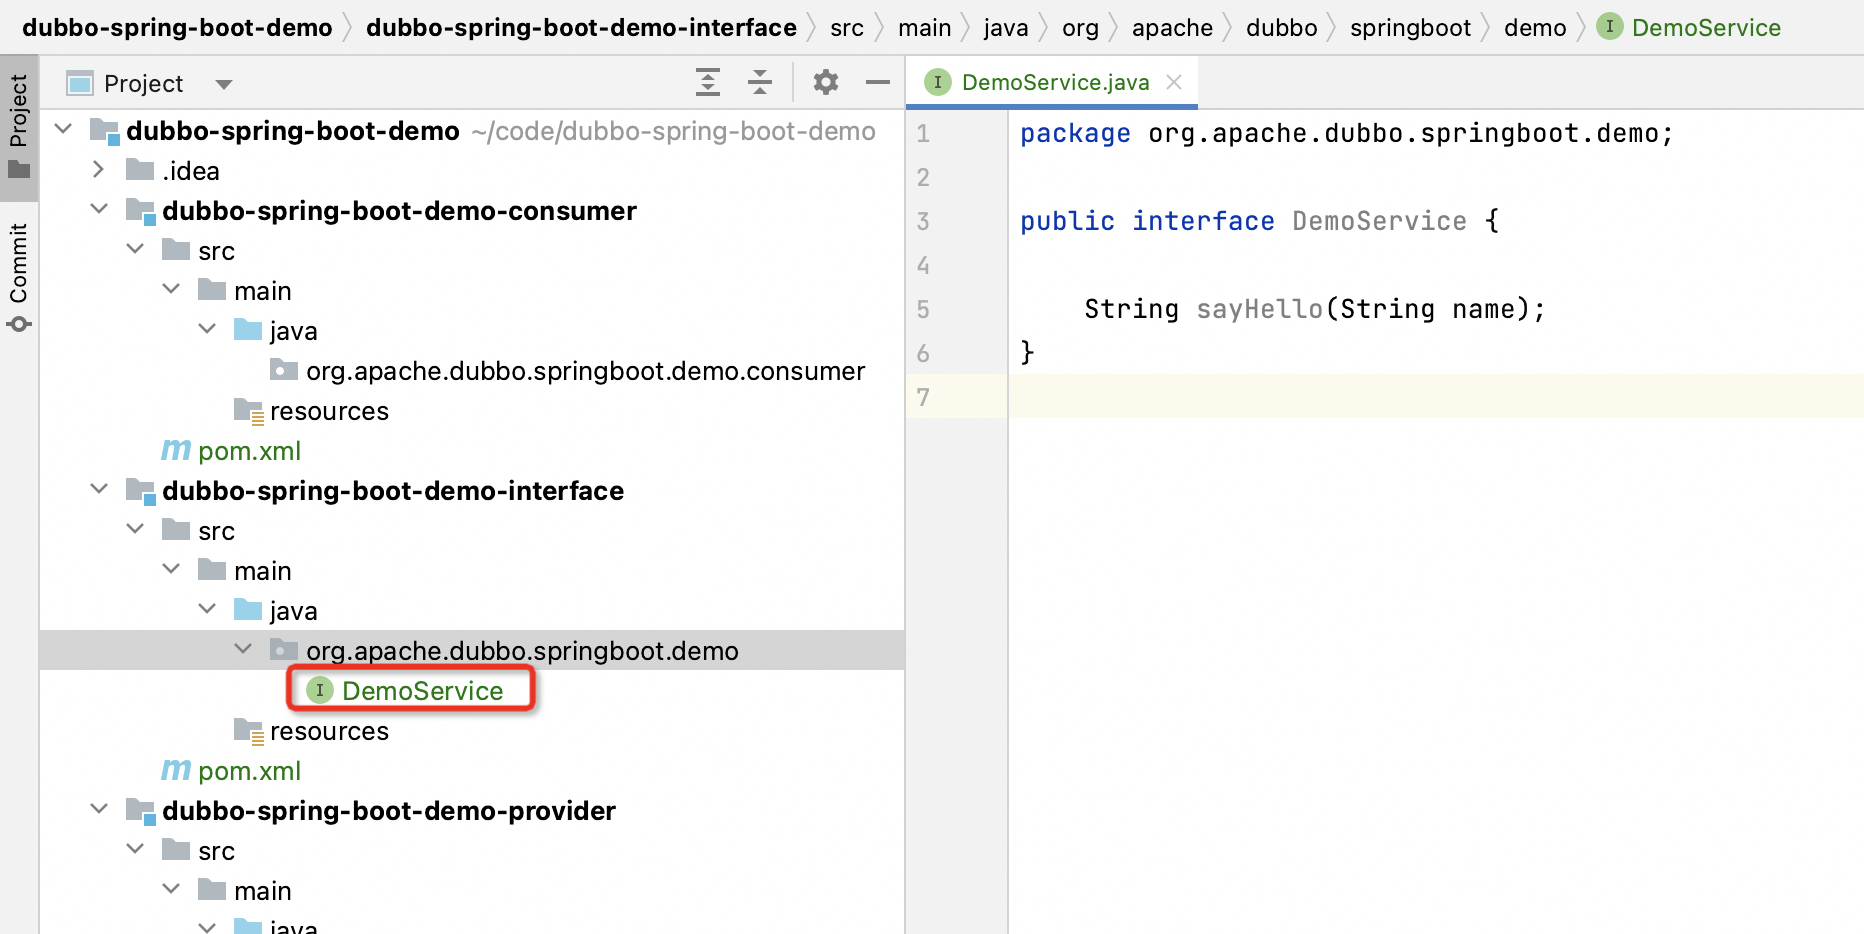
在 dubbo-spring-boot-demo-interface 模块的 org.apache.dubbo.samples.api 下创建 DemoService 接口,定义如下
package org.apache.dubbo.springboot.demo;

public interface DemoService {

    String sayHello(String name);
}
在 DemoService 中,定义了 sayHello 方法。服务器发布的后续服务和消费者订阅的服务都是围绕 DemoService 接口开发的。
5. 定义服务器的实现
定义完服务接口后,可以在服务器端定义相应的实现。与消费者端相比,这部分实现是远程实现,本地没有相关信息。

在 dubbo-spring-boot-demo-provider 模块的 org.apache.dubbo.samples.provider 下创建 DemoServiceImpl 类,定义如下
package org.apache.dubbo.springboot.demo.provider;

import org.apache.dubbo.config.annotation.DubboService;
import org.apache.dubbo.springboot.demo.DemoService;

@DubboService
public class DemoServiceImpl implements DemoService {

    @Override
    public String sayHello(String name) {
        return "Hello " + name;
    }
}
在 DemoServiceImpl 中,实现 DemoService 接口,对于 sayHello 方法返回 Hello name。
注意:DemoServiceImpl 类添加了 @DubboService 注解。通过这种配置,可以基于 Spring Boot 发布 Dubbo 服务。
6. 配置服务器端的 Yaml 配置文件
从这一步到第 7 步,将通过 Spring Boot 配置 Dubbo 的一些基本信息。
首先,让我们为服务器创建一个配置文件。
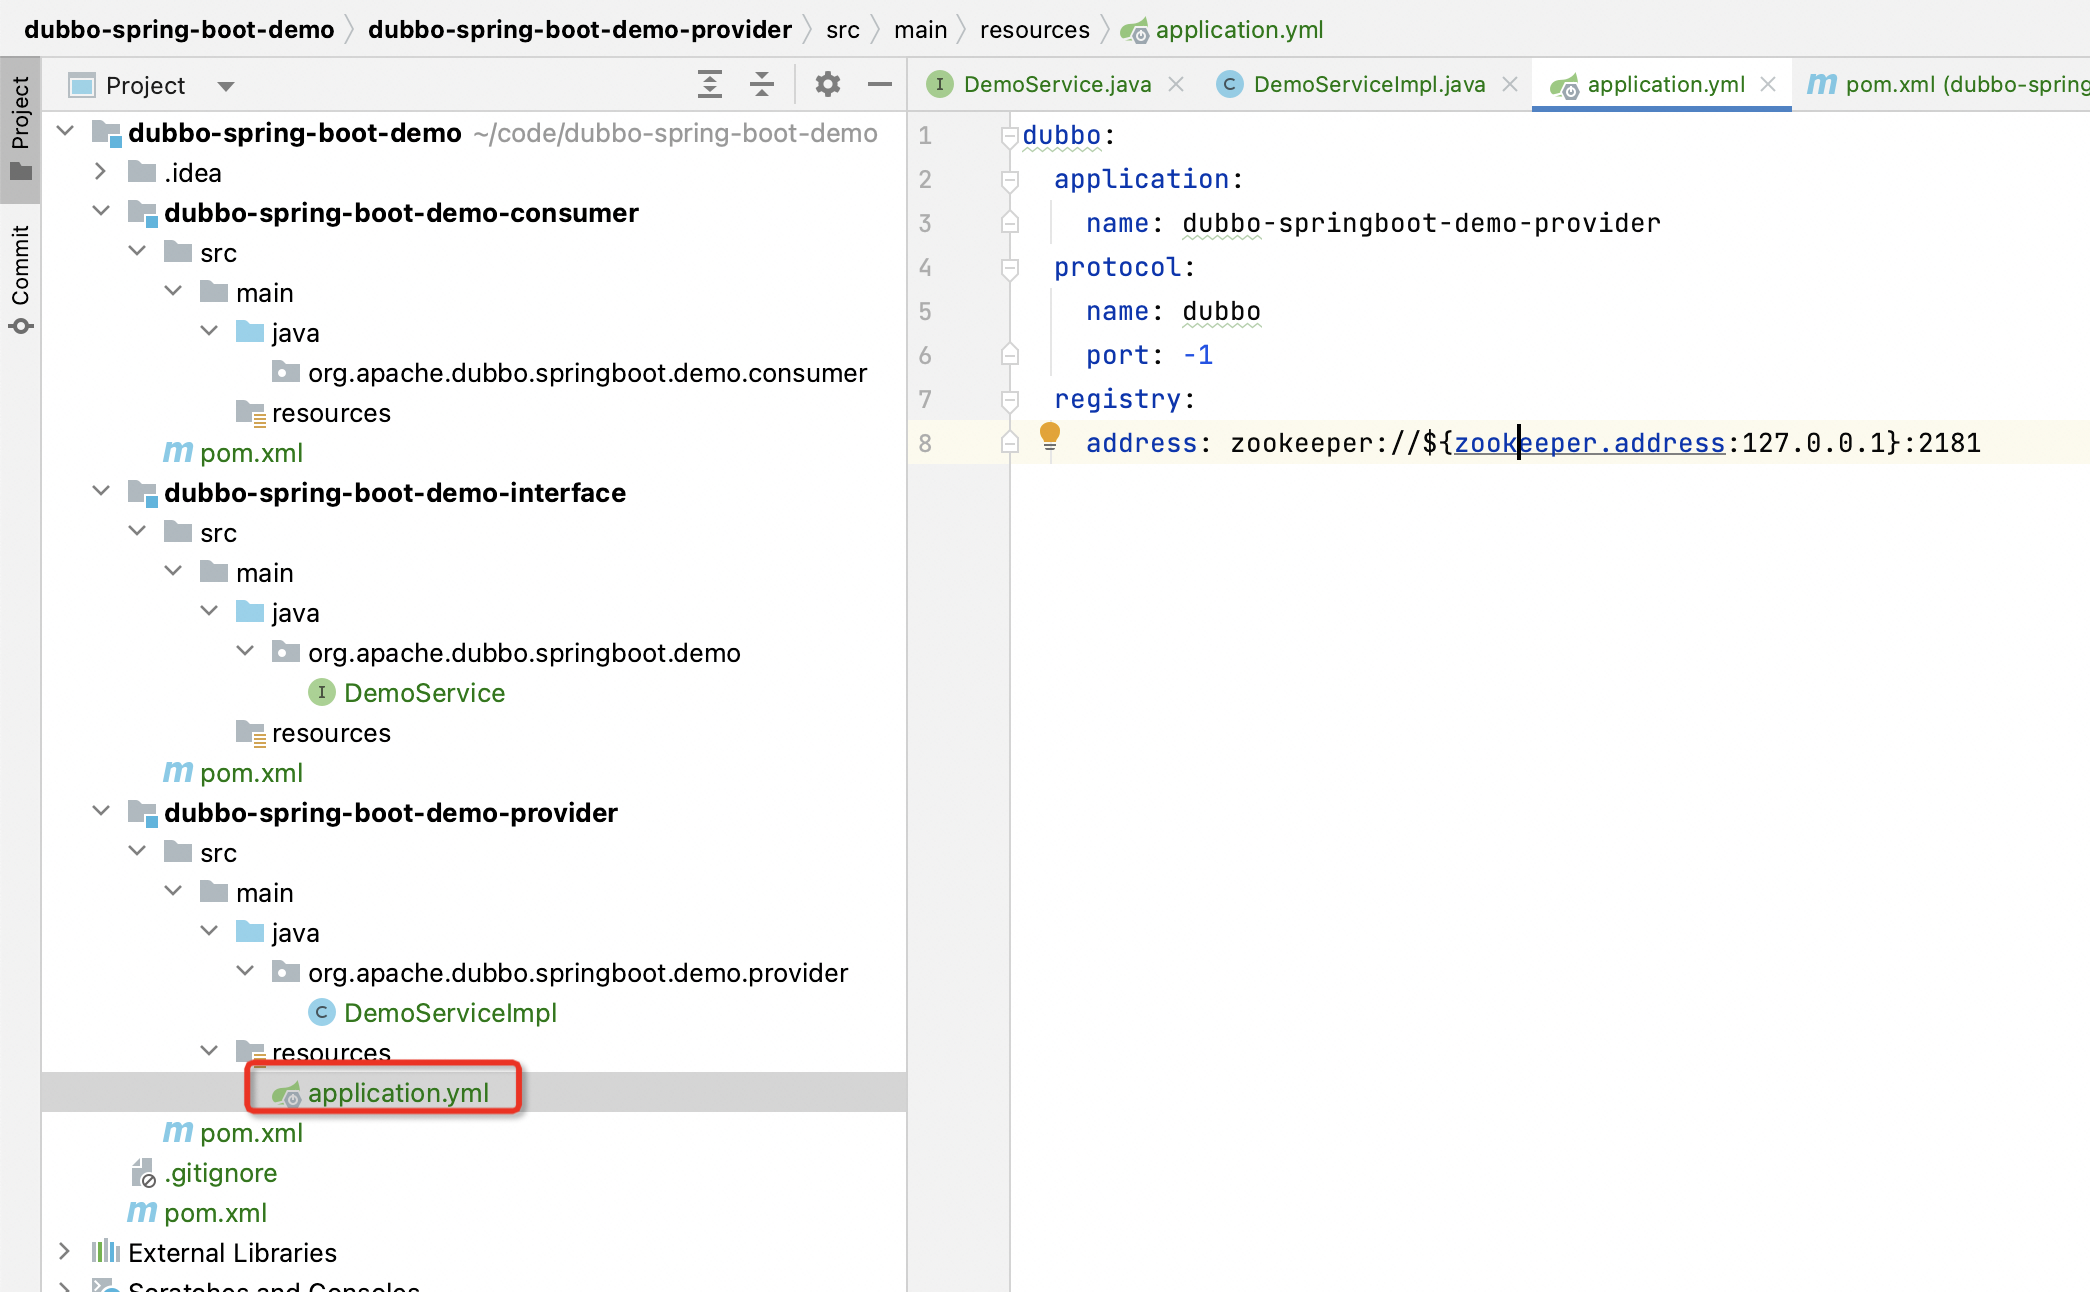
在 dubbo-spring-boot-demo-provider 模块的 resources 资源文件夹下创建 application.yml 文件,定义如下
dubbo:
  application:
    name: dubbo-springboot-demo-provider
  protocol:
    name: dubbo
    port: -1
  registry:
    address: zookeeper://${zookeeper.address:127.0.0.1}:2181
在这个配置文件中,定义了 Dubbo 的应用程序名称、Dubbo 协议信息以及 Dubbo 使用的注册中心地址。
7. 配置消费者端的 Yaml 配置文件
同样,我们需要为消费者创建一个配置文件。

在 dubbo-spring-boot-demo-consumer 模块的 resources 资源文件夹下创建 application.yml 文件,定义如下
dubbo:
  application:
    name: dubbo-springboot-demo-consumer
  protocol:
    name: dubbo
    port: -1
  registry:
    address: zookeeper://${zookeeper.address:127.0.0.1}:2181
在这个配置文件中,定义了 Dubbo 的应用程序名称、Dubbo 协议信息以及 Dubbo 使用的注册中心地址。
8. 基于 Spring 配置服务器启动类
除了配置 Yaml 配置文件,我们还需要创建一个基于 Spring Boot 的启动类。
首先,我们先创建服务器的启动类。

在 dubbo-spring-boot-demo-provider 模块的 org.apache.dubbo.springboot.demo.provider 下创建 Application 类,定义如下
package org.apache.dubbo.springboot.demo.provider;

import org.apache.dubbo.config.spring.context.annotation.EnableDubbo;
import org.springframework.boot.SpringApplication;
import org.springframework.boot.autoconfigure.SpringBootApplication;

@SpringBootApplication
@EnableDubbo
public class ProviderApplication {
    public static void main(String[] args) {
        SpringApplication.run(ProviderApplication.class, args);
    }
}
在这个启动类中,配置了一个 ProviderApplication 来读取上面第 6 步定义的 application.yml 配置文件并启动应用程序。
9. 基于 Spring 配置消费者启动类
同样,我们需要为消费者创建一个启动类。

在 dubbo-spring-boot-demo-consumer 模块的 org.apache.dubbo.springboot.demo.consumer 下创建 Application 类,定义如下
package org.apache.dubbo.springboot.demo.consumer;

import org.apache.dubbo.config.spring.context.annotation.EnableDubbo;
import org.springframework.boot.SpringApplication;
import org.springframework.boot.autoconfigure.SpringBootApplication;

@SpringBootApplication
@EnableDubbo
public class ConsumerApplication {

    public static void main(String[] args) {
        SpringApplication.run(ConsumerApplication.class, args);
    }
}
在这个启动类中,配置了一个 ConsumerApplication 来读取上面第 7 步定义的 application.yml 配置文件并启动应用程序。
10. 配置消费者请求任务
除了配置消费者端的启动类,我们还可以基于 Spring Boot 模式中的 CommandLineRunner 创建它

在 dubbo-spring-boot-demo-consumer 模块的 org.apache.dubbo.springboot.demo.consumer 下创建一个 Task 类,定义如下
package org.apache.dubbo.springboot.demo.consumer;

import java.util.Date;

import org.apache.dubbo.config.annotation.DubboReference;
import org.apache.dubbo.springboot.demo.DemoService;
import org.springframework.boot.CommandLineRunner;
import org.springframework.stereotype.Component;

@Component
public class Task implements CommandLineRunner {
    @DubboReference
    private DemoService demoService;

    @Override
    public void run(String... args) throws Exception {
        String result = demoService. sayHello("world");
        System.out.println("Receive result ======> " + result);

        new Thread(()-> {
            while (true) {
                try {
                    Thread. sleep(1000);
                    System.out.println(new Date() + " Receive result ======> " + demoService.sayHello("world"));
                } catch (InterruptedException e) {
                    e.printStackTrace();
                    Thread. currentThread(). interrupt();
                }
            }
        }).start();
    }
}
在 Task 类中,通过 @DubboReference 从 Dubbo 获取一个 RPC 订阅,这个 demoService 可以像本地调用一样直接调用。在 run 方法中为调用创建了一个线程。
11. 启动应用程序
到第 10 步,代码已经开发完成,本节将启动整个项目并进行验证。

首先是启动 org.apache.dubbo.samples.provider.Application,等待一段时间后出现下图所示的日志(Current Spring Boot Application is await),表示服务提供者已经启动,标志着服务提供者可以对外提供服务。
[Dubbo] Current Spring Boot Application is await...
然后启动 org.apache.dubbo.samples.client.Application,等待一段时间后看到下图所示的日志(Hello world),表示服务消费者已经启动,成功获取到对服务器的调用。

Receive result ======> Hello world
进一步阅读
1. Dubbo 的 Spring 配置介绍
Dubbo 的主要配置项包括 yaml 配置内容、@DubboReference 和 @DubboService 等。更多详情请参考 [注解配置 | Apache Dubbo](/zh-cn/overview/mannual/java-sdk/reference-manual /config/annotation/) 文章。
更多
本教程介绍了如何基于 Dubbo x Spring Boot 开发微服务应用程序。在下一节中,将介绍另一种 Dubbo 配置方法 - Dubbo x Spring XML。