4 - Dubbo x Spring XML 开发微服务应用
目标
从零开始开发 Dubbo x Spring XML 基于的微服务开发,并理解 Dubbo x Spring XML 的配置方式。
难度
低
环境要求
系统:Windows、Linux、MacOS
JDK 8 及以上(推荐 JDK17)
Git
IntelliJ IDEA(可选)
Docker(可选)
快速部署(直接基于 Samples 启动)
本章将手把手教你通过几个简单的命令,部署并运行一个基于 Dubbo x Spring XML 的用例。
注意:本章部署的代码细节可以在 apache/dubbo-samples 仓库的 1-basic/dubbo-samples-spring-xml 中找到,下一章也会进行讲解。
1. 获取测试项目
在开始整个教程之前,我们需要获取测试项目的代码。Dubbo 的所有测试用例代码都存储在 apache/dubbo-samples 仓库中,以下命令可以帮助你获取 Samples 仓库中的所有代码。
git clone --depth=1 --branch master git@github.com:apache/dubbo-samples.git
2. 启动一个简单的注册中心
对于一个微服务应用来说,注册中心是一个不可或缺的组件。只有通过注册中心,消费者才能成功发现服务端的地址信息,进而进行调用。
为了让本教程更易于使用,我们提供了一个基于 Apache Zookeeper 注册中心的简单启动器。如果你需要在生产环境中部署注册中心,请参考 生产环境初始化 部署高可用的注册中心。
Windows:
./mvnw.cmd clean compile exec:java -pl tools/embedded-zookeeper

Linux / MacOS:
./mvnw clean compile exec:java -pl tools/embedded-zookeeper

Docker:
docker run --name some-zookeeper -p 2181:2181 --restart always -d zookeeper
3. 启动服务提供者
启动注册中心后,下一步就是启动一个对外提供服务的服务提供者。dubbo-samples 中也提供了相应的示例,可以通过以下命令快速拉起。
Windows:
./mvnw.cmd clean compile exec:java -pl 1-basic/dubbo-samples-spring-xml "-Dexec.mainClass=org.apache.dubbo.samples.provider.Application"

Linux / MacOS:
./mvnw clean compile exec:java -pl 1-basic/dubbo-samples-spring-xml -Dexec.mainClass="org.apache.dubbo.samples.provider.Application"

Note: You need to open an independent terminal to run, and the command will keep executing.
执行完以上命令后,等待片刻,直到出现以下日志(Dubbo Application[1.1](demo-provider) is ready.),就表示服务提供者已经启动,说明服务提供者可以提供服务了。
[08/02/23 03:26:52:052 CST] org.apache.dubbo.samples.provider.Application.main() INFO metadata.ConfigurableMetadataServiceExporter: [DUBBO] The MetadataService exports urls : [dubbo://30.221. 128.96:20880/org.apache.dubbo.metadata.MetadataService?anyhost=true&application=demo-provider&background=false&bind.ip=30.221.128.96&bind.port=20880&connections=1&corethreads=2&delay=true0&deprecated=false&dubbo=10ync=0genic=0genic=0&exeted =false&getAndListenInstanceMetadata.1.callback=true&getAndListenInstanceMetadata.return=true&getAndListenInstanceMetadata.sent=true&group=demo-provider&interface=org.apache.dubbo.metadata.MetadataService&ipv6=fd00:1:5:5200:4d53:9f5:a545:804d&methods=exportInstanceMetadata,getAndListenInstanceMetadata , getExportedServiceURLs, getExportedURLs, getExportedURLs, getExportedURLs, getExportedURLs, getExportedURLs, getInstanceMetadataChangedListenerMap, getMetadataInfo, getMetadataInfos, getMetadataURL, getServiceDefinition, getServiceDefinition, getSubscribedURLs, isMetadata aService,serviceName,toSortedStrings,toSortedStrings,version&pid=70803®ister=false&release=3.1.6&revision=3.1.6&side=provider&threadpool=cached&threads=100×tamp=1675841212727&version=1.0.0], dubbo version: 3.1.23host: 6
[08/02/23 03:26:52:052 CST] org.apache.dubbo.samples.provider.Application.main() INFO metadata.ServiceInstanceMetadataUtils: [DUBBO] Start registering instance address to registry., dubbo version: 3.1 .6, current host: 30.221.128.96
[08/02/23 03:26:52:052 CST] org.apache.dubbo.samples.provider.Application.main() INFO metadata.MetadataInfo: [DUBBO] metadata revision changed: null -> 602d44cc6d653b9cd42ab23c3948b5ab, app: demo -provider, services: 1, dubbo version: 3.1.6, current host: 30.221.128.96
[08/02/23 03:26:52:052 CST] org.apache.dubbo.samples.provider.Application.main() INFO deploy.DefaultApplicationDeployer: [DUBBO] Dubbo Application[1.1](demo-provider) is ready ., dubbo version: 3.1.6, current host: 30.221.128.96
4. 启动服务消费者
最后一步是启动一个服务消费者来调用服务提供者,这是 RPC 调用的核心,为服务消费者调用服务提供者提供桥梁。
Windows:
./mvnw.cmd clean compile exec:java -pl 1-basic/dubbo-samples-spring-xml "-Dexec.mainClass=org.apache.dubbo.samples.client.Application"

Linux / MacOS:
./mvnw clean compile exec:java -pl 1-basic/dubbo-samples-spring-xml -Dexec.mainClass="org.apache.dubbo.samples.client.Application"
执行完以上命令后,等待片刻,直到出现以下日志(hi, dubbo),打印的数据是服务提供者处理后返回的,标志着一次服务调用成功。
[08/02/23 03:28:23:023 CST] org.apache.dubbo.samples.client.Application.main() INFO deploy.DefaultApplicationDeployer: [DUBBO] Dubbo Application[1.1](demo-consumer) is ready ., dubbo version: 3.1.6, current host: 30.221.128.96
Receive result ======> hi, dubbo
动手实践(从零代码开发版本)
本章将手把手教你通过一步步的教程,从零开始开发一个微服务应用。
1. 启动注册中心
对于一个微服务应用来说,注册中心是一个不可或缺的组件。只有通过注册中心,消费者才能成功发现服务端的地址信息,进而进行调用。
为了让本教程更易于使用,我们提供了一个基于 Apache Zookeeper 注册中心的简单启动器。如果你需要在生产环境中部署注册中心,请参考 生产环境初始化 部署高可用的注册中心。
Windows:
git clone --depth=1 --branch master git@github.com:apache/dubbo-samples.git
cd dubbo-samples
./mvnw.cmd clean compile exec:java -pl tools/embedded-zookeeper

Linux / MacOS:
git clone --depth=1 --branch master git@github.com:apache/dubbo-samples.git
cd dubbo-samples
./mvnw clean compile exec:java -pl tools/embedded-zookeeper

Docker:
docker run --name some-zookeeper -p 2181:2181 --restart always -d zookeeper
2. 初始化项目
从本节开始,项目将基于 IntelliJ IDEA 进行构建和测试。
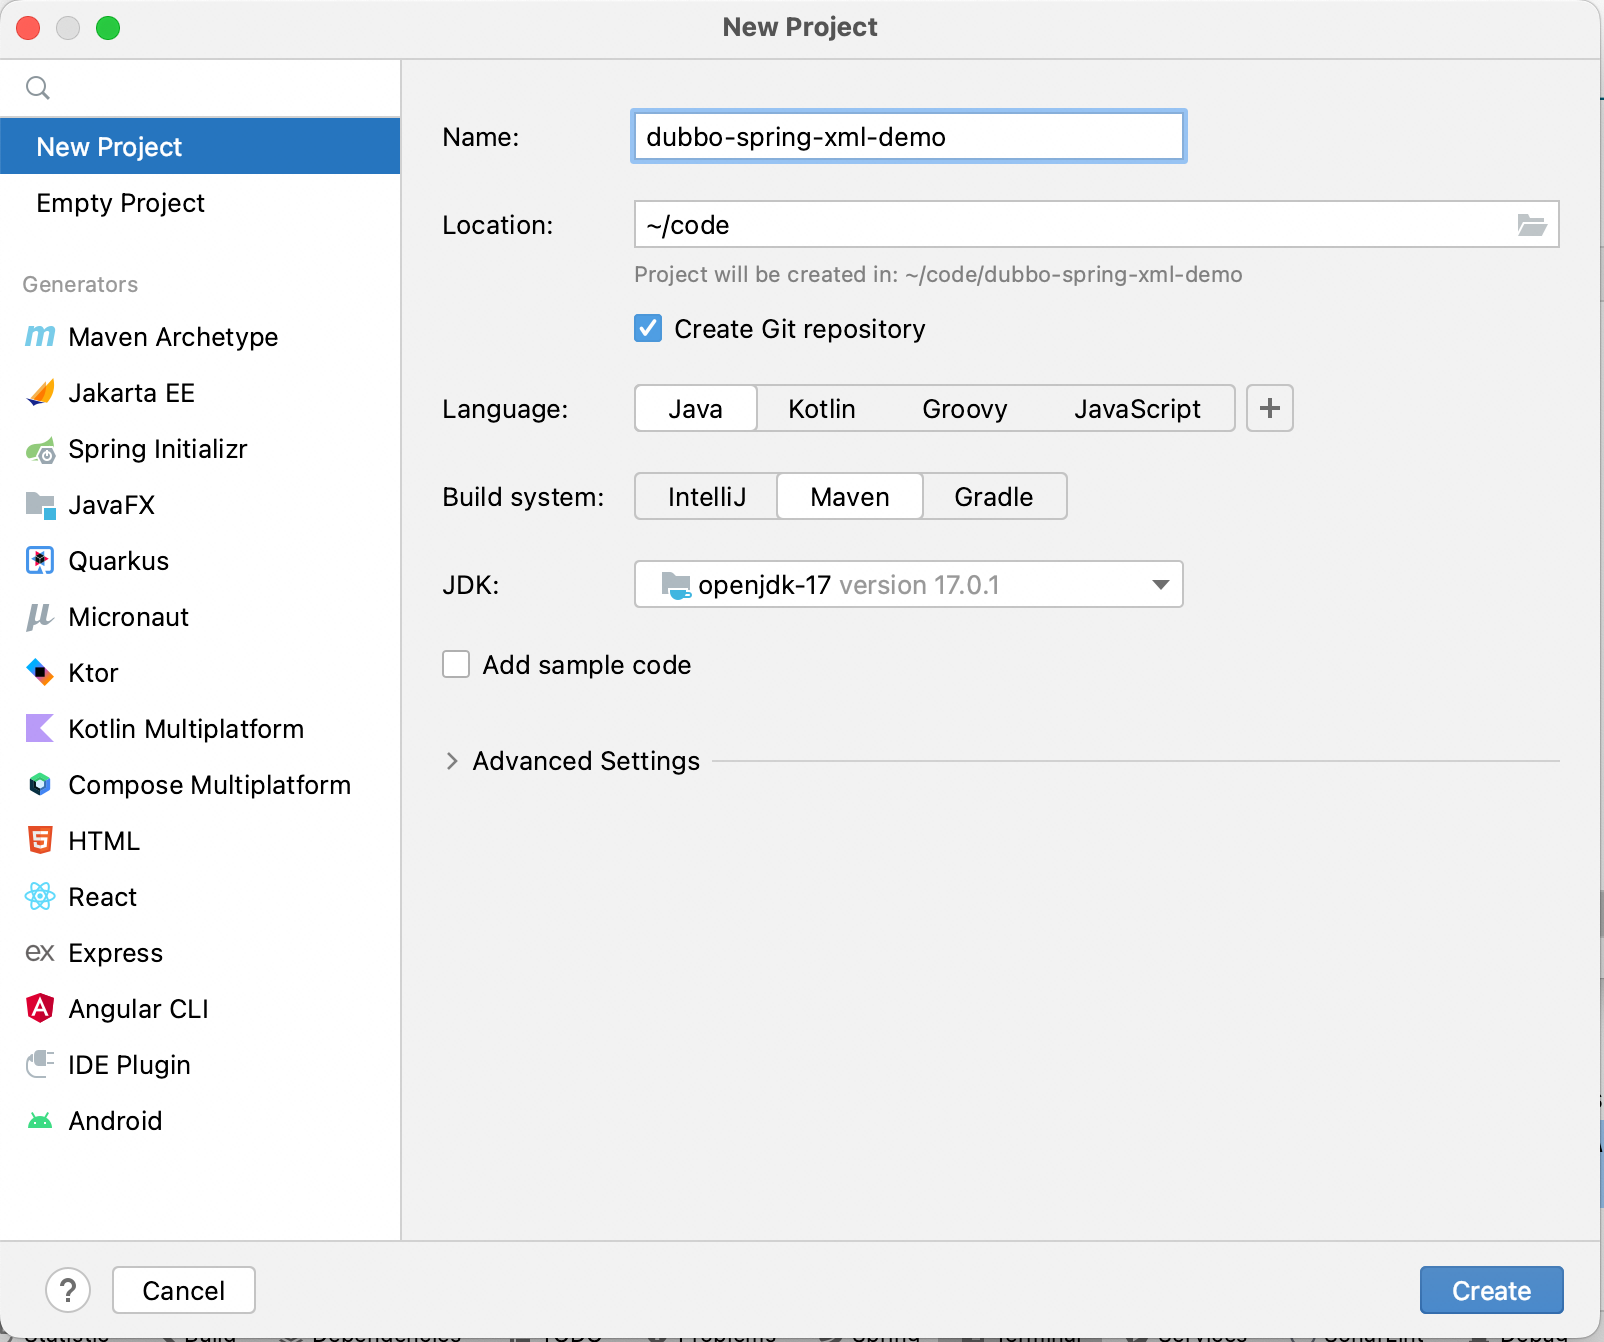
如上图所示,可以构建一个基本的项目。
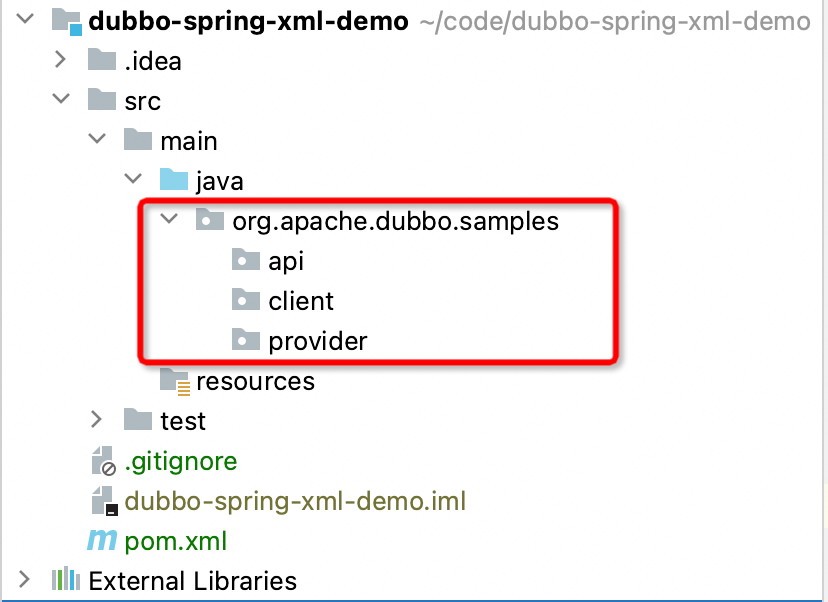
初始化项目后,需要在 src/main/java 目录下创建 org.apache.dubbo.samples.api、org.apache.dubbo.samples.client 和 org.apache.dubbo.samples.provider 三个包。
未来,我们将在 api 下创建对应的接口,在 client 下创建对应的客户端订阅服务功能,在 provider 下创建对应的服务端实现和发布服务功能。
以上三个包分别对应应用依赖的 API、消费者端应用的模块和服务端应用的模块。在实际部署中,需要拆分成三个项目,消费者和服务的共同依赖是 api 模块。从简易性出发,本教程将开发在同一个项目中,通过多个启动类进行区分。
3. 添加 Maven 依赖
初始化项目后,我们需要先添加 Dubbo 相关的 maven 依赖。
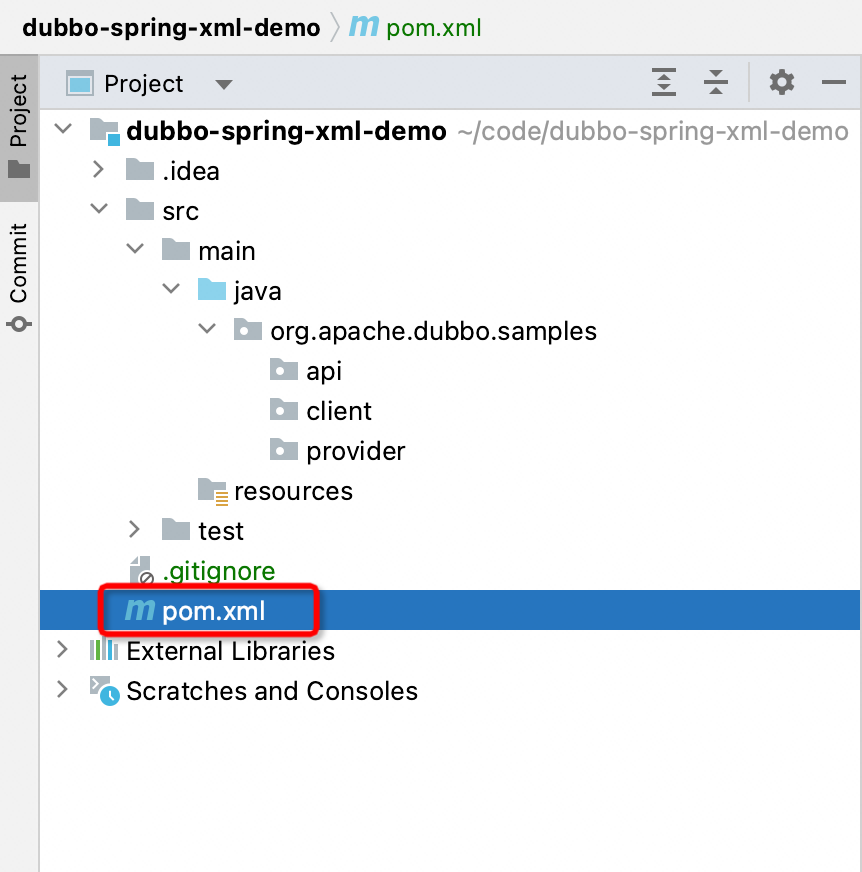
编辑 pom.xml 文件,添加以下配置。
    <dependencies>
        <dependency>
            <groupId>org.apache.dubbo</groupId>
            <artifactId>dubbo</artifactId>
            <version>3.1.6</version>
        </dependency>

        <dependency>
            <groupId>org.springframework</groupId>
            <artifactId>spring-context</artifactId>
            <version>5.3.25</version>
        </dependency>

        <dependency>
            <groupId>org.apache.curator</groupId>
            <artifactId>curator-x-discovery</artifactId>
            <version>5.2.0</version>
        </dependency>
        <dependency>
            <groupId>org.apache.zookeeper</groupId>
            <artifactId>zookeeper</artifactId>
            <version>3.8.0</version>
        </dependency>
    </dependencies>
在这个配置中,定义了 dubbo 和 zookeeper(以及对应的连接器 curator)的依赖。
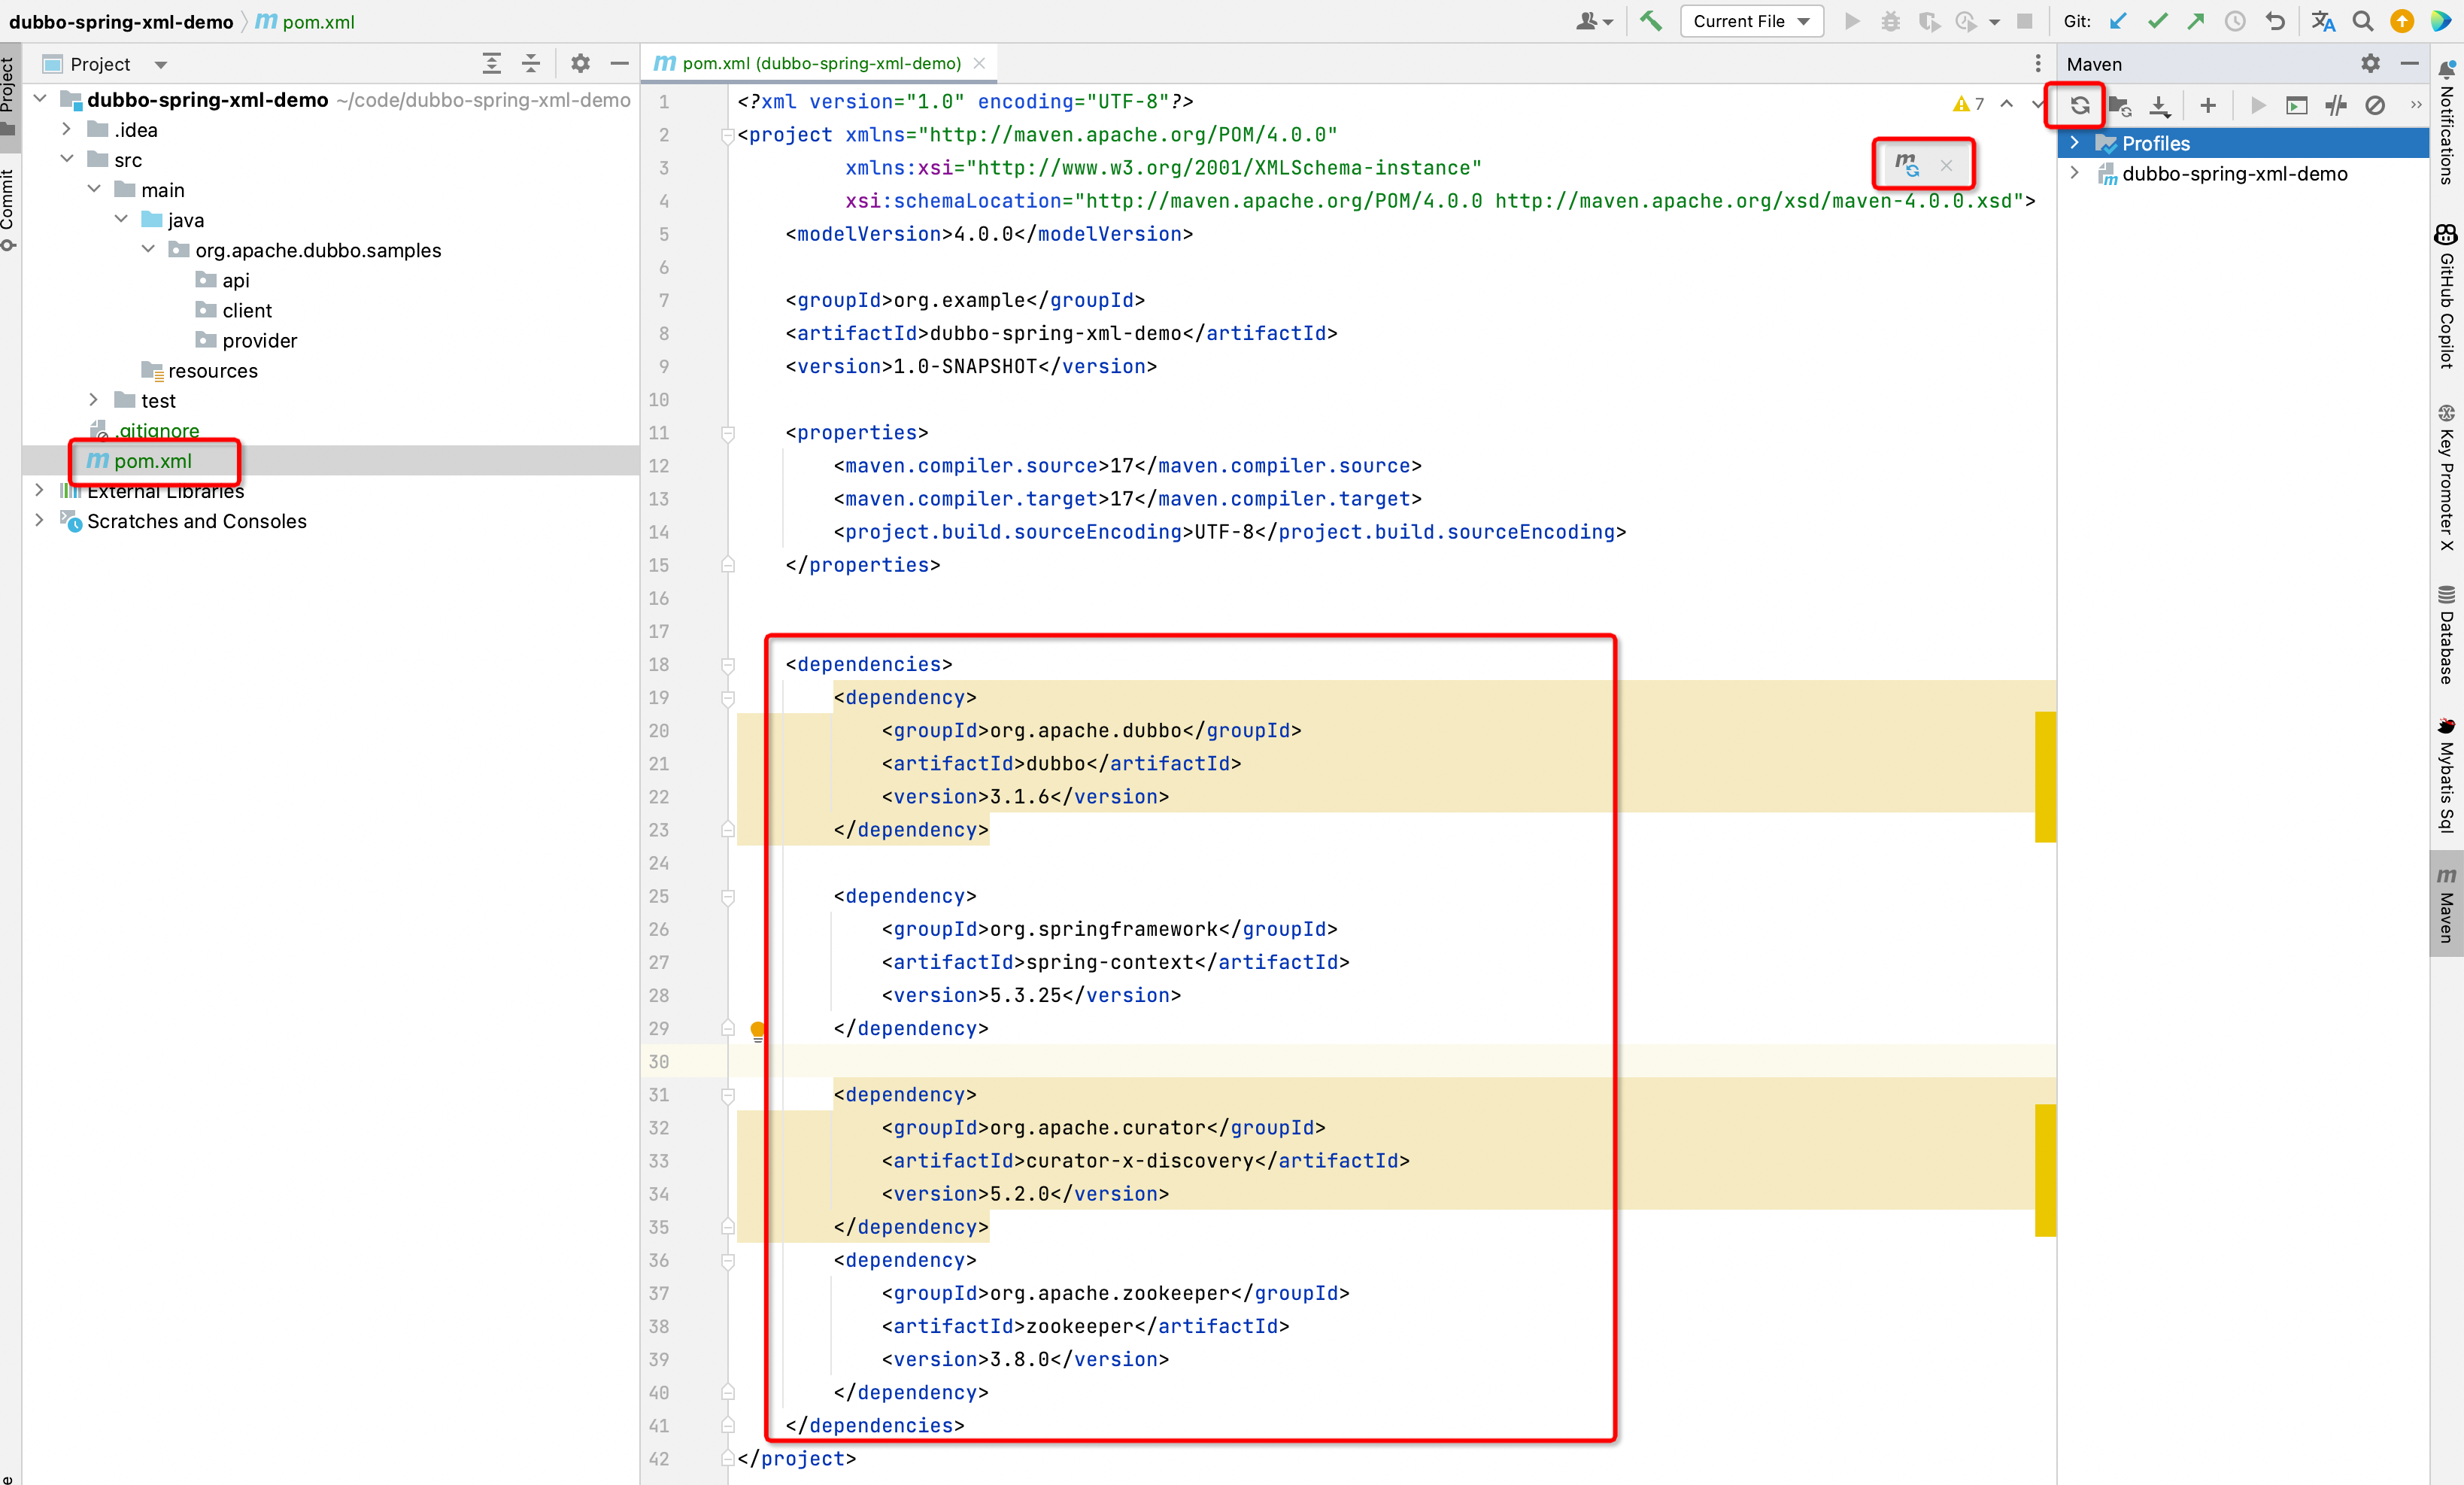
添加完以上配置后,可以通过 IDEA 的 Maven - Reload All Maven Projects 刷新依赖。
4. 定义服务接口
服务接口是 Dubbo 中消费者和服务端之间的桥梁。
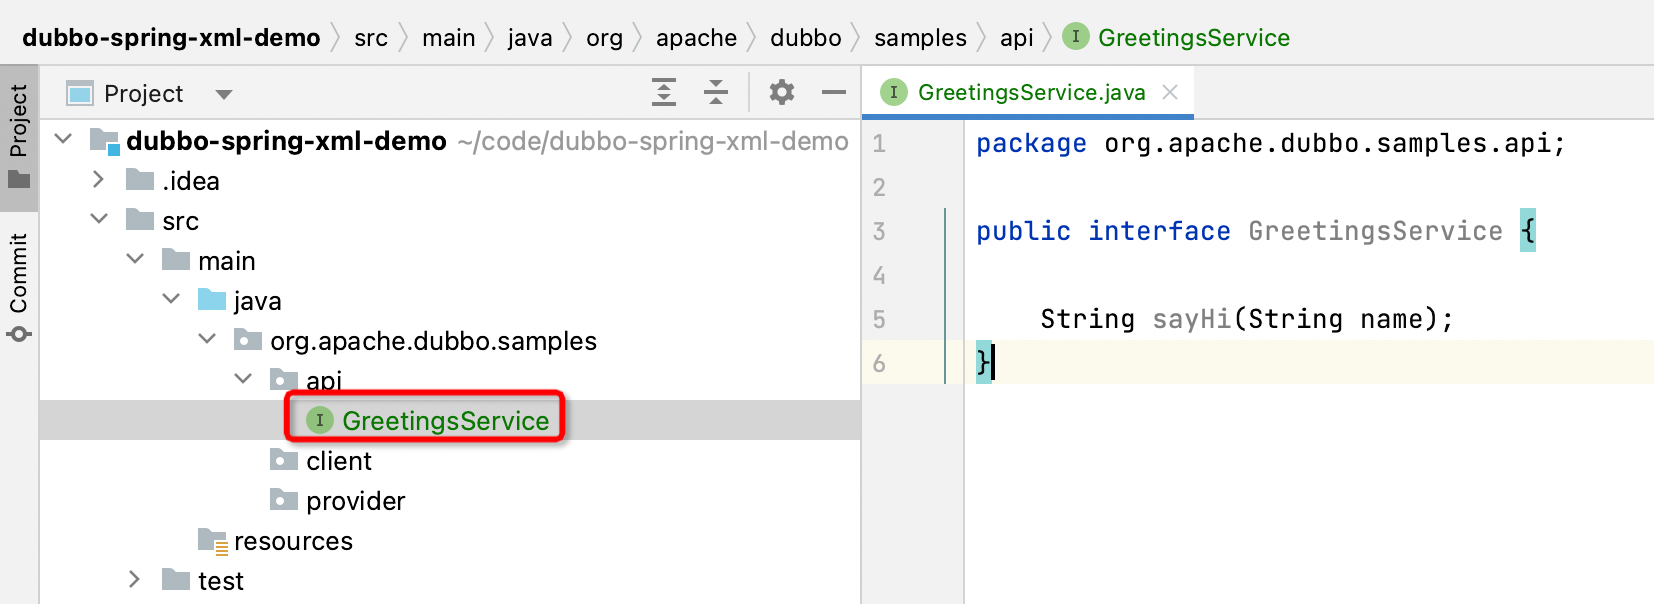
在 org.apache.dubbo.samples.api 下创建 GreetingsService 接口,定义如下
package org.apache.dubbo.samples.api;

public interface GreetingsService {

    String sayHi(String name);
}
在 GreetingsService 中,定义了 sayHi 方法。后续服务端发布的服务和消费者订阅的服务,都是围绕 GreetingsService 接口进行开发的。
5. 定义服务端的实现
定义完服务接口后,就可以在服务端定义对应的实现。与消费者端相比,这部分的实现是远程实现,本地没有相关信息。
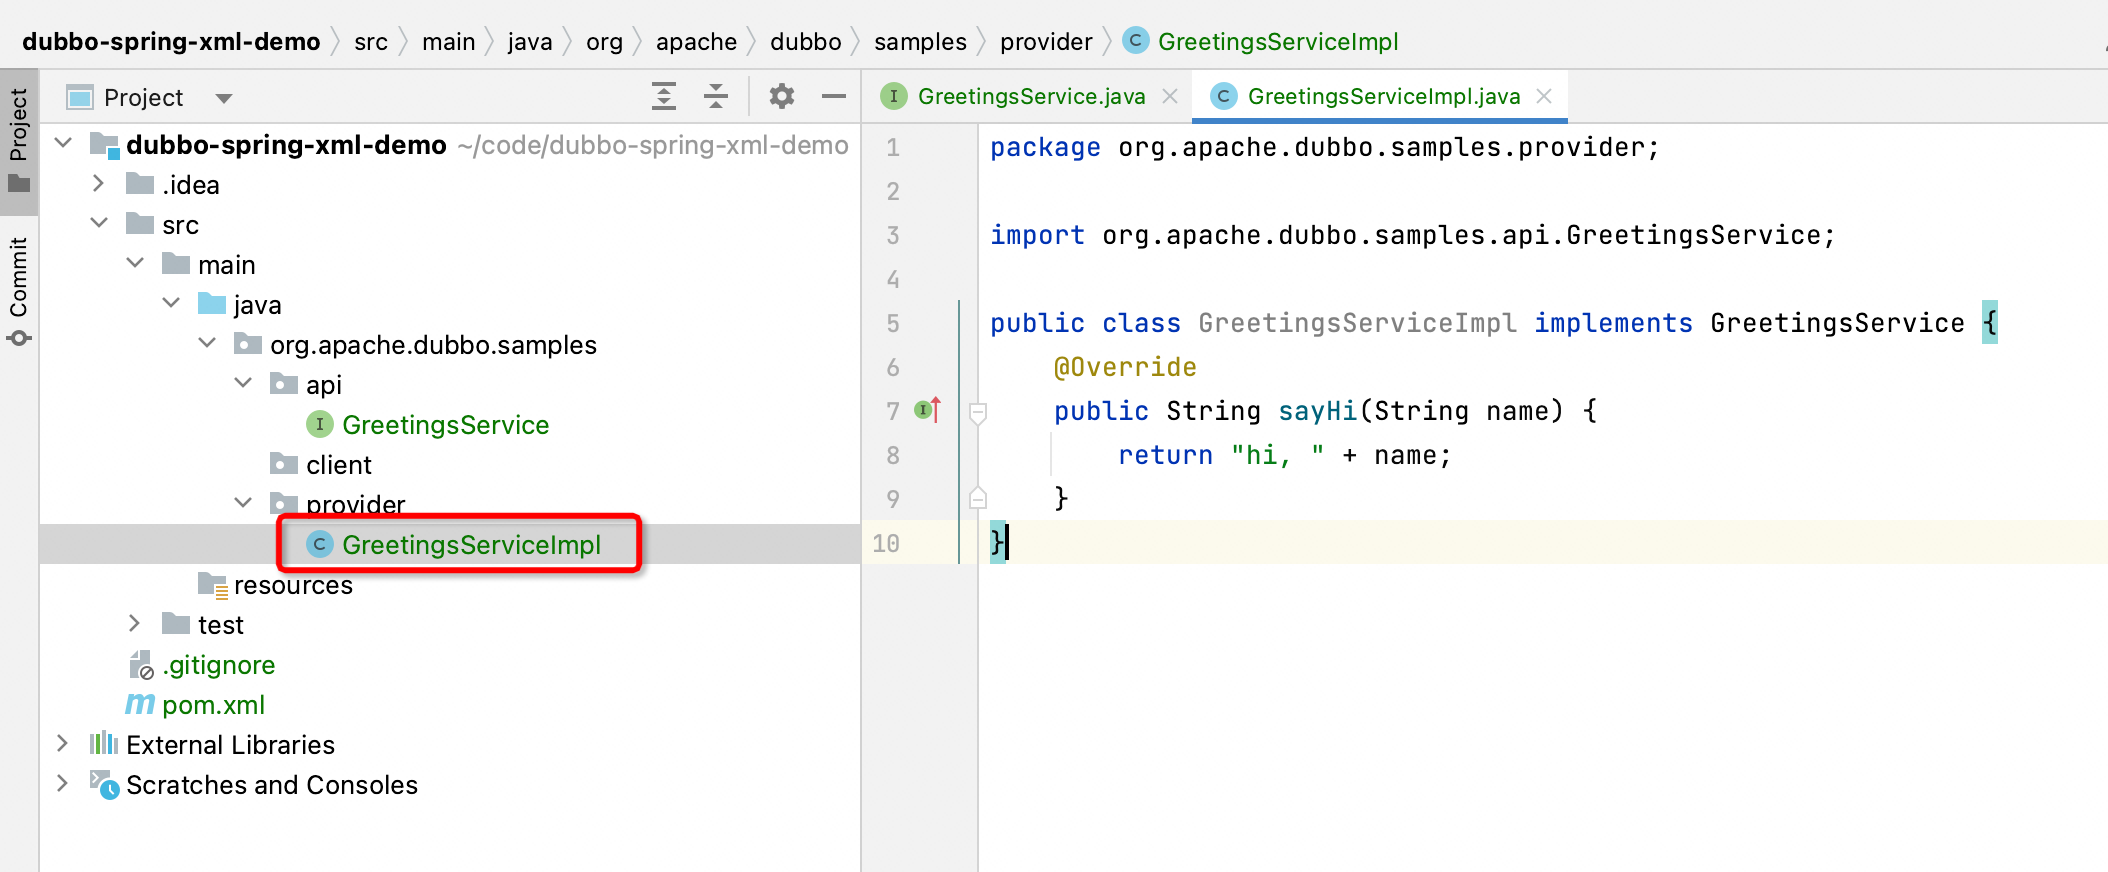
在 org.apache.dubbo.samples.provider 包下创建 GreetingsServiceImpl 类,定义如下
package org.apache.dubbo.samples.provider;

import org.apache.dubbo.samples.api.GreetingsService;

public class GreetingsServiceImpl implements GreetingsService {
    @Override
    public String sayHi(String name) {
        return "hi," + name;
    }
}
在 GreetingsServiceImpl 中,实现 GreetingsService 接口,对于 sayHi 方法,返回 hi, name。
6. 配置服务端 XML 配置文件
从这一步到第 7 步,Dubbo 服务的信息将通过 Spring XML 配置。
首先,让我们为服务器创建一个配置文件。

在 resources 资源文件夹下创建一个 dubbo-demo-provider.xml 文件,定义如下
<?xml version="1.0" encoding="UTF-8"?>
<beans xmlns:xsi="http://www.w3.org/2001/XMLSchema-instance"
       xmlns:dubbo="https://dubbo.apache.org/schema/dubbo"
       xmlns="http://www.springframework.org/schema/beans" xmlns:context="http://www.springframework.org/schema/context"
       xsi:schemaLocation="http://www.springframework.org/schema/beans http://www.springframework.org/schema/beans/spring-beans.xsd
       https://dubbo.apache.org/schema/dubbo https://dubbo.apache.org/schema/dubbo/dubbo.xsd http://www.springframework.org/schema/context http://www.springframework .org/schema/context/spring-context.xsd">
    <context:property-placeholder/>

    <!-- Define application name -->
    <dubbo:application name="demo-provider"/>

    <!-- Define the registration center address -->
    <dubbo:registry address="zookeeper://127.0.0.1:2181"/>

    <!-- Define the bean corresponding to the implementation class -->
    <bean id="greetingsService" class="org.apache.dubbo.samples.provider.GreetingsServiceImpl"/>
    <!-- Define service information, refer to the above bean -->
    <dubbo:service interface="org.apache.dubbo.samples.api.GreetingsService" ref="greetingsService"/>

</beans>
在这个配置文件中,定义了 Dubbo 的应用程序名称、Dubbo 使用的注册中心地址、发布服务的 Spring bean 以及通过 Dubbo 发布的 bean。
7. 配置消费者 XML 配置文件
同样地,我们需要为消费者创建一个配置文件。

在 resources 资源文件夹下创建一个 dubbo-demo-consumer.xml 文件,定义如下
<?xml version="1.0" encoding="UTF-8"?>

<beans xmlns:xsi="http://www.w3.org/2001/XMLSchema-instance"
       xmlns:dubbo="https://dubbo.apache.org/schema/dubbo"
       xmlns="http://www.springframework.org/schema/beans" xmlns:context="http://www.springframework.org/schema/context"
       xsi:schemaLocation="http://www.springframework.org/schema/beans http://www.springframework.org/schema/beans/spring-beans.xsd
       https://dubbo.apache.org/schema/dubbo https://dubbo.apache.org/schema/dubbo/dubbo.xsd http://www.springframework.org/schema/context http://www.springframework .org/schema/context/spring-context.xsd">
    <context:property-placeholder/>

    <!-- Define application name -->
    <dubbo:application name="demo-provider"/>

    <!-- Define the registration center address -->
    <dubbo:registry address="zookeeper://127.0.0.1:2181"/>

    <!-- Define subscription information, Dubbo will create corresponding beans in Spring Context -->
    <dubbo:reference id="greetingsService" interface="org.apache.dubbo.samples.api.GreetingsService"/>

</beans>
在这个配置文件中,定义了 Dubbo 应用程序名称、Dubbo 使用的注册中心地址以及订阅的服务信息。
8. 基于 Spring 配置服务器启动类
除了配置 XML 配置文件,我们还需要创建一个基于 Spring Context 的启动类。
首先,我们先创建服务器的启动类。
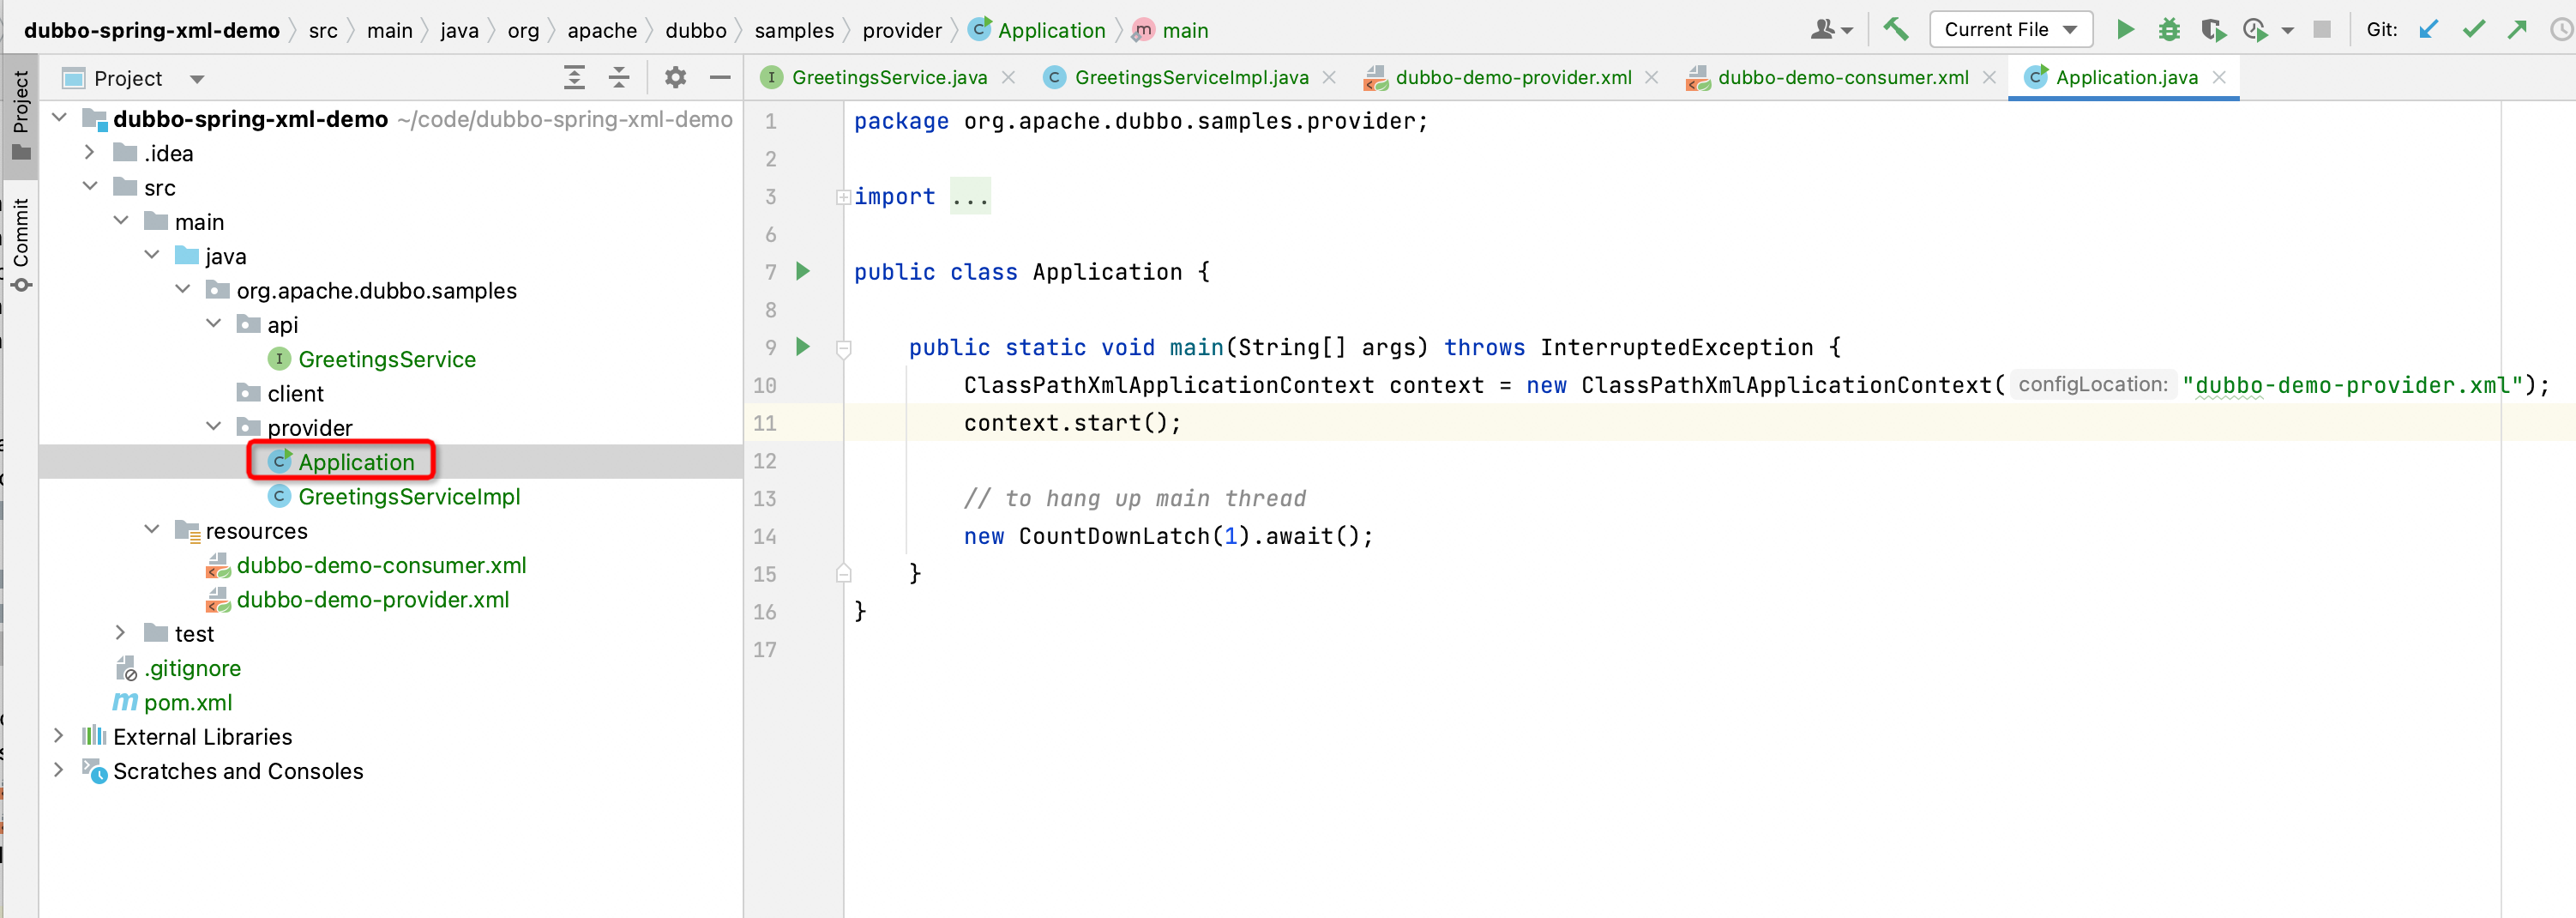
在 org.apache.dubbo.samples.provider 包下创建 Application 类,定义如下
package org.apache.dubbo.samples.provider;

import java.util.concurrent.CountDownLatch;

import org.springframework.context.support.ClassPathXmlApplicationContext;

public class Application {

    public static void main(String[] args) throws InterruptedException {
        ClassPathXmlApplicationContext context = new ClassPathXmlApplicationContext("dubbo-demo-provider.xml");
        context. start();

        // Suspend the main thread to prevent exit
        new CountDownLatch(1). await();
    }
}
在这个启动类中,配置了一个 ClassPathXmlApplicationContext 来读取之前步骤 6 中定义的 dubbo-demo-provider.xml 配置文件。
9. 基于 Spring 配置消费者启动类
同样地,我们需要为消费者创建一个启动类。
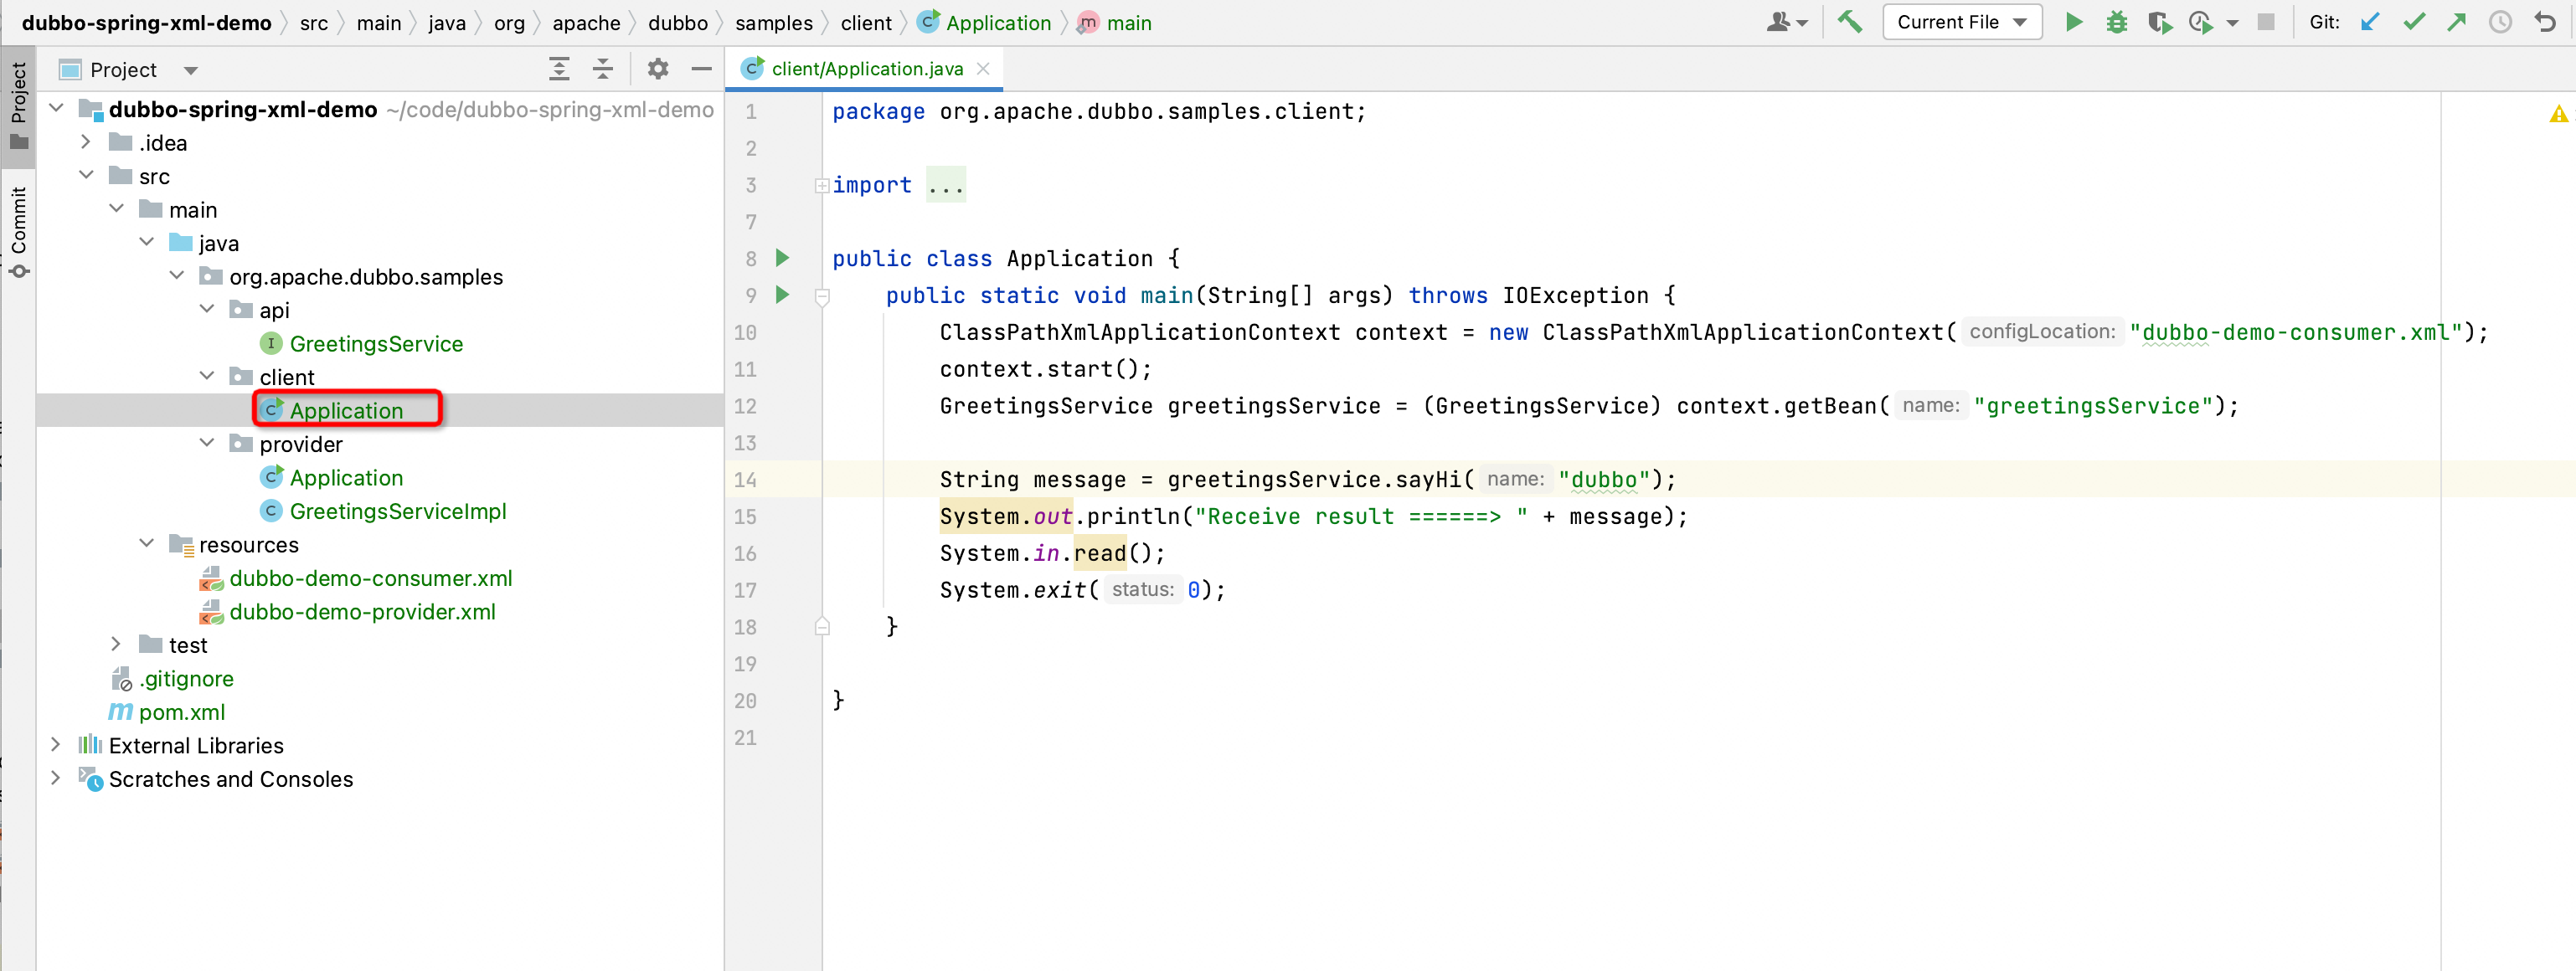
在 org.apache.dubbo.samples.client 包下创建 Application 类,定义如下
package org.apache.dubbo.samples.client;

import java.io.IOException;

import org.apache.dubbo.samples.api.GreetingsService;
import org.springframework.context.support.ClassPathXmlApplicationContext;

public class Application {
    public static void main(String[] args) throws IOException {
        ClassPathXmlApplicationContext context = new ClassPathXmlApplicationContext("dubbo-demo-consumer.xml");
        context. start();
        GreetingsService greetingsService = (GreetingsService) context. getBean("greetingsService");

        String message = greetingsService.sayHi("dubbo");
        System.out.println("Receive result ======> " + message);
        System.in.read();
        System. exit(0);
    }

}
在这个启动类中,主要执行三个功能
配置一个
ClassPathXmlApplicationContext来读取之前步骤 7 中定义的dubbo-demo-consumer.xml配置文件从 Spring Context 中获取 Dubbo 创建的名为
greetingsService的 bean通过这个 bean 发起对远程端的调用
10. 启动应用程序
到第 9 步,代码已经开发完成,本节将启动整个项目并进行验证。
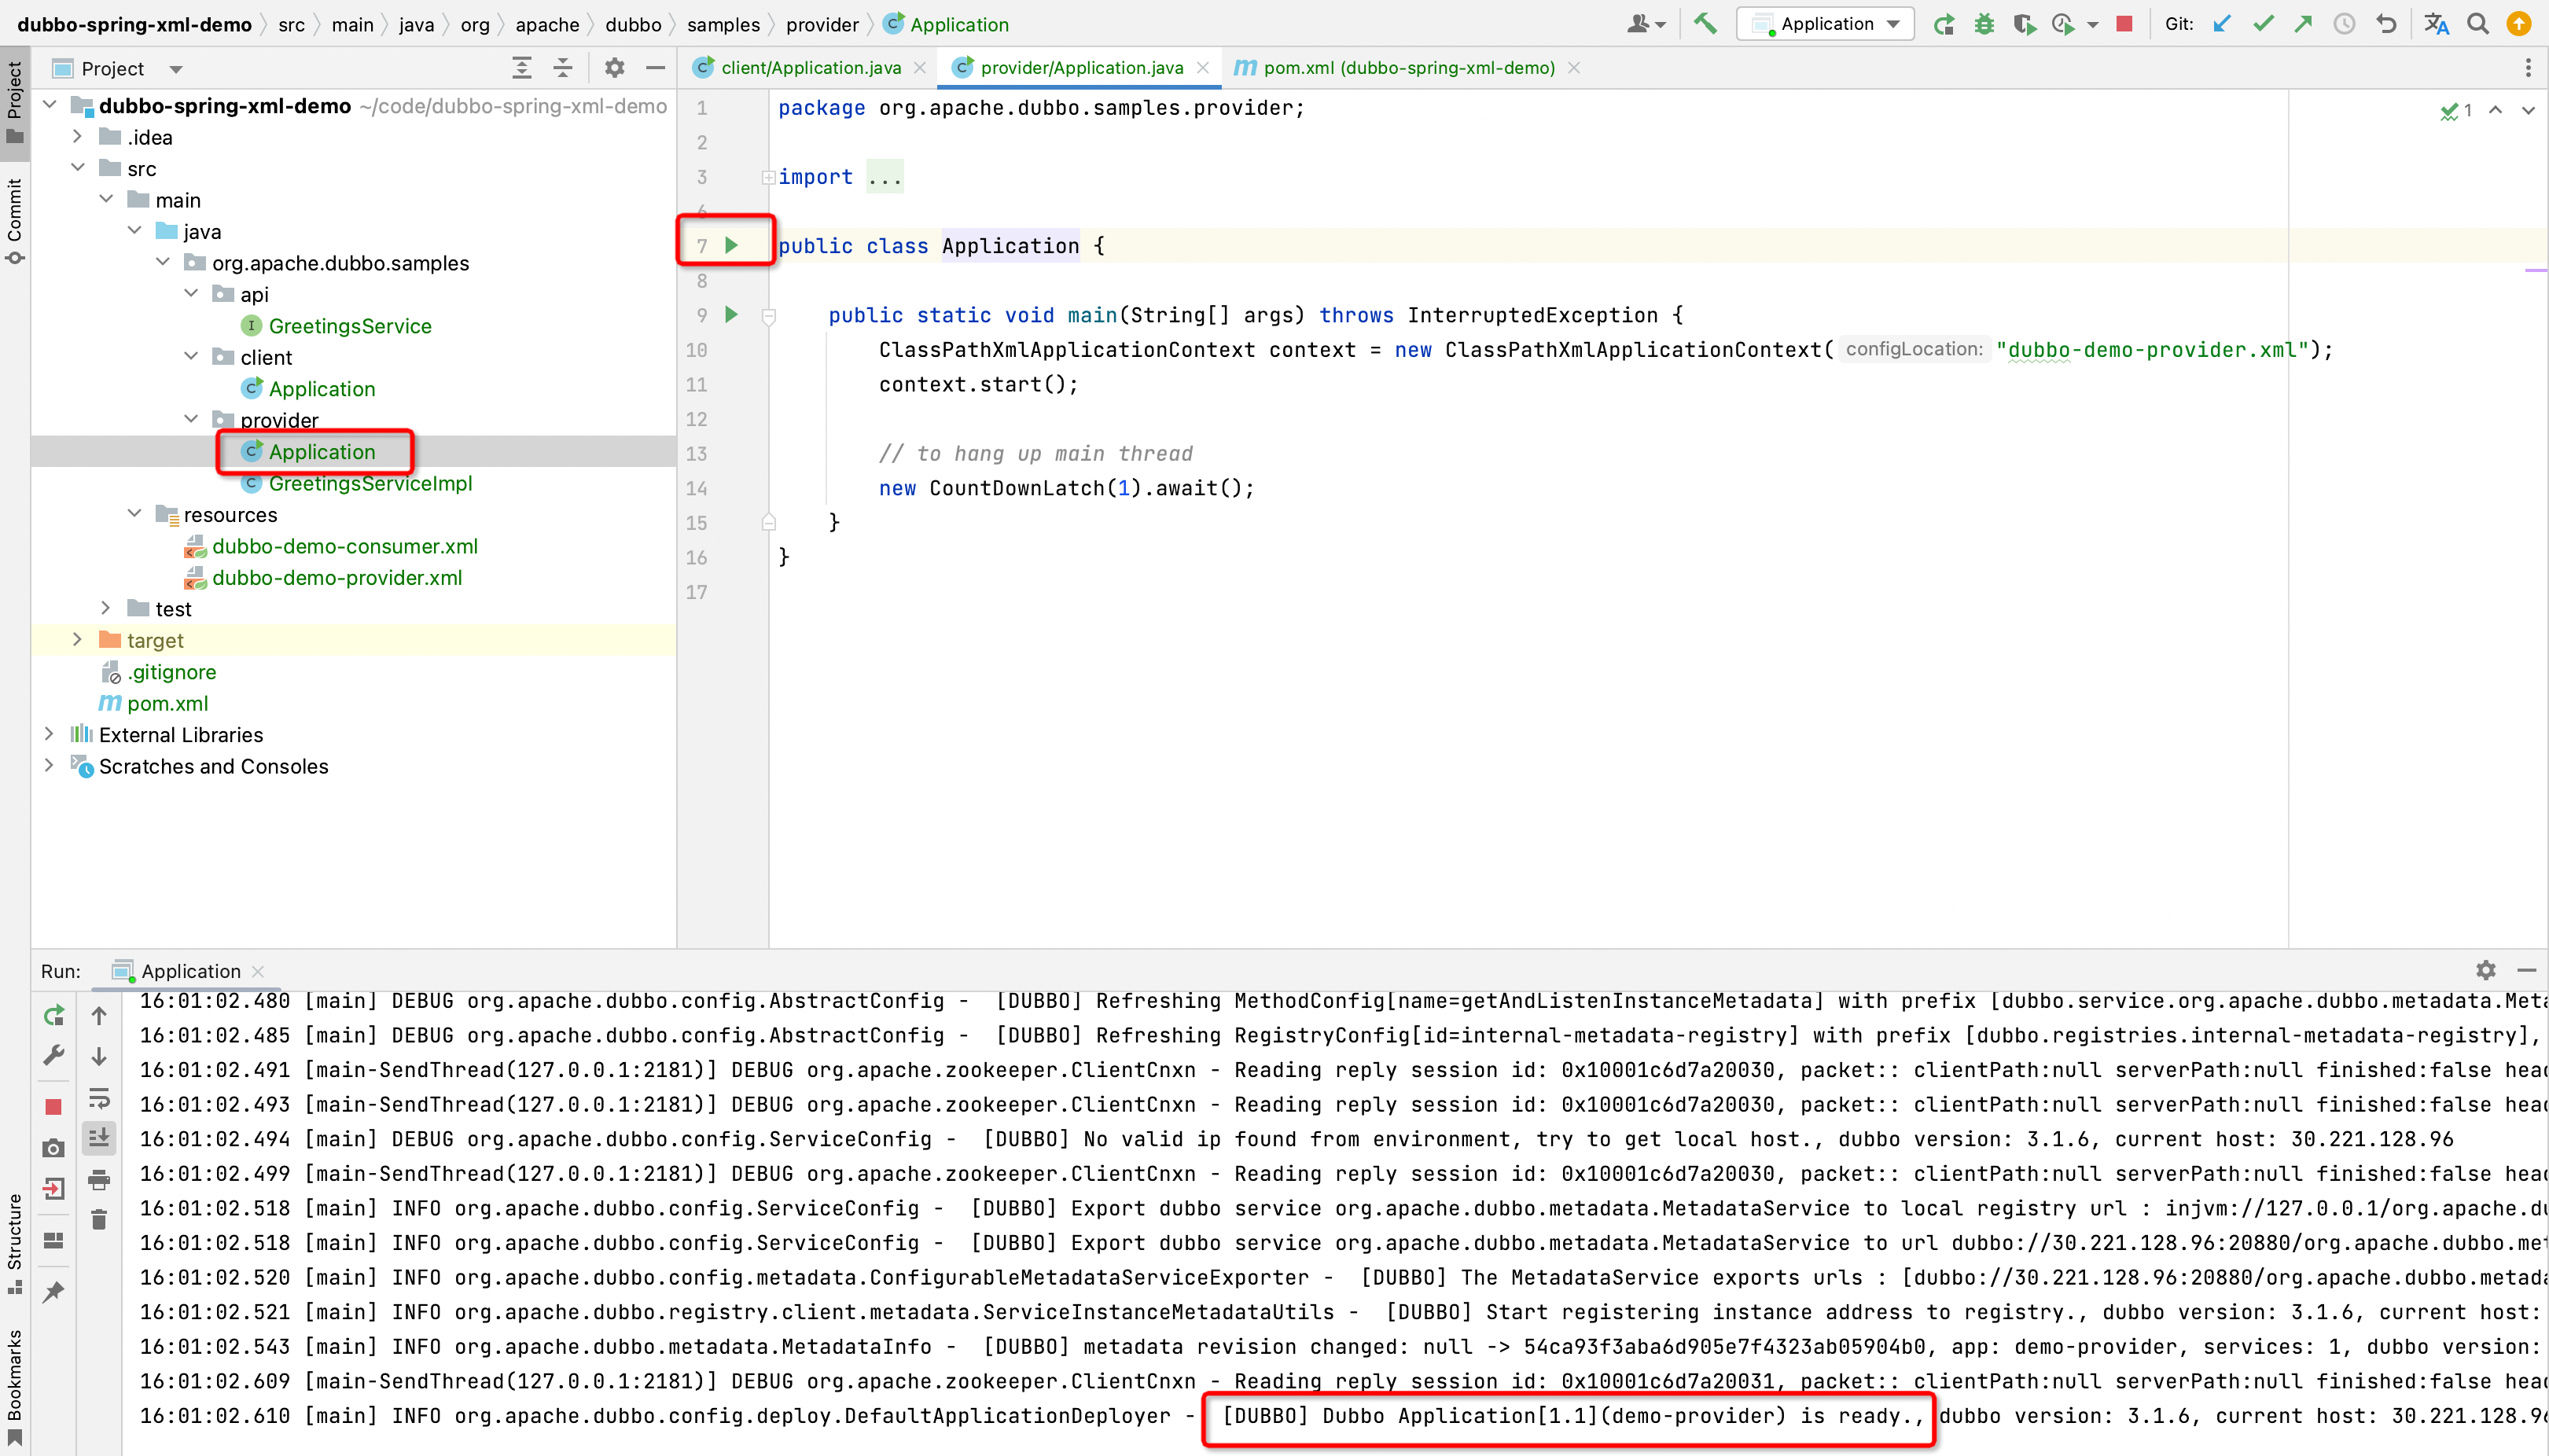
首先启动 org.apache.dubbo.samples.provider.Application,等待一段时间后出现如下所示的日志(Dubbo Application[1.1](demo-provider) is ready),表示服务提供者已启动,表明服务提供者可以对外提供服务。
[DUBBO] Dubbo Application[1.1](demo-provider) is ready., dubbo version: 3.1.6, current host: 30.221.128.96
然后启动 org.apache.dubbo.samples.client.Application,等待一段时间后看到如下所示的日志(hi, dubbo),表示服务消费者已启动,成功获取了对服务器的调用。
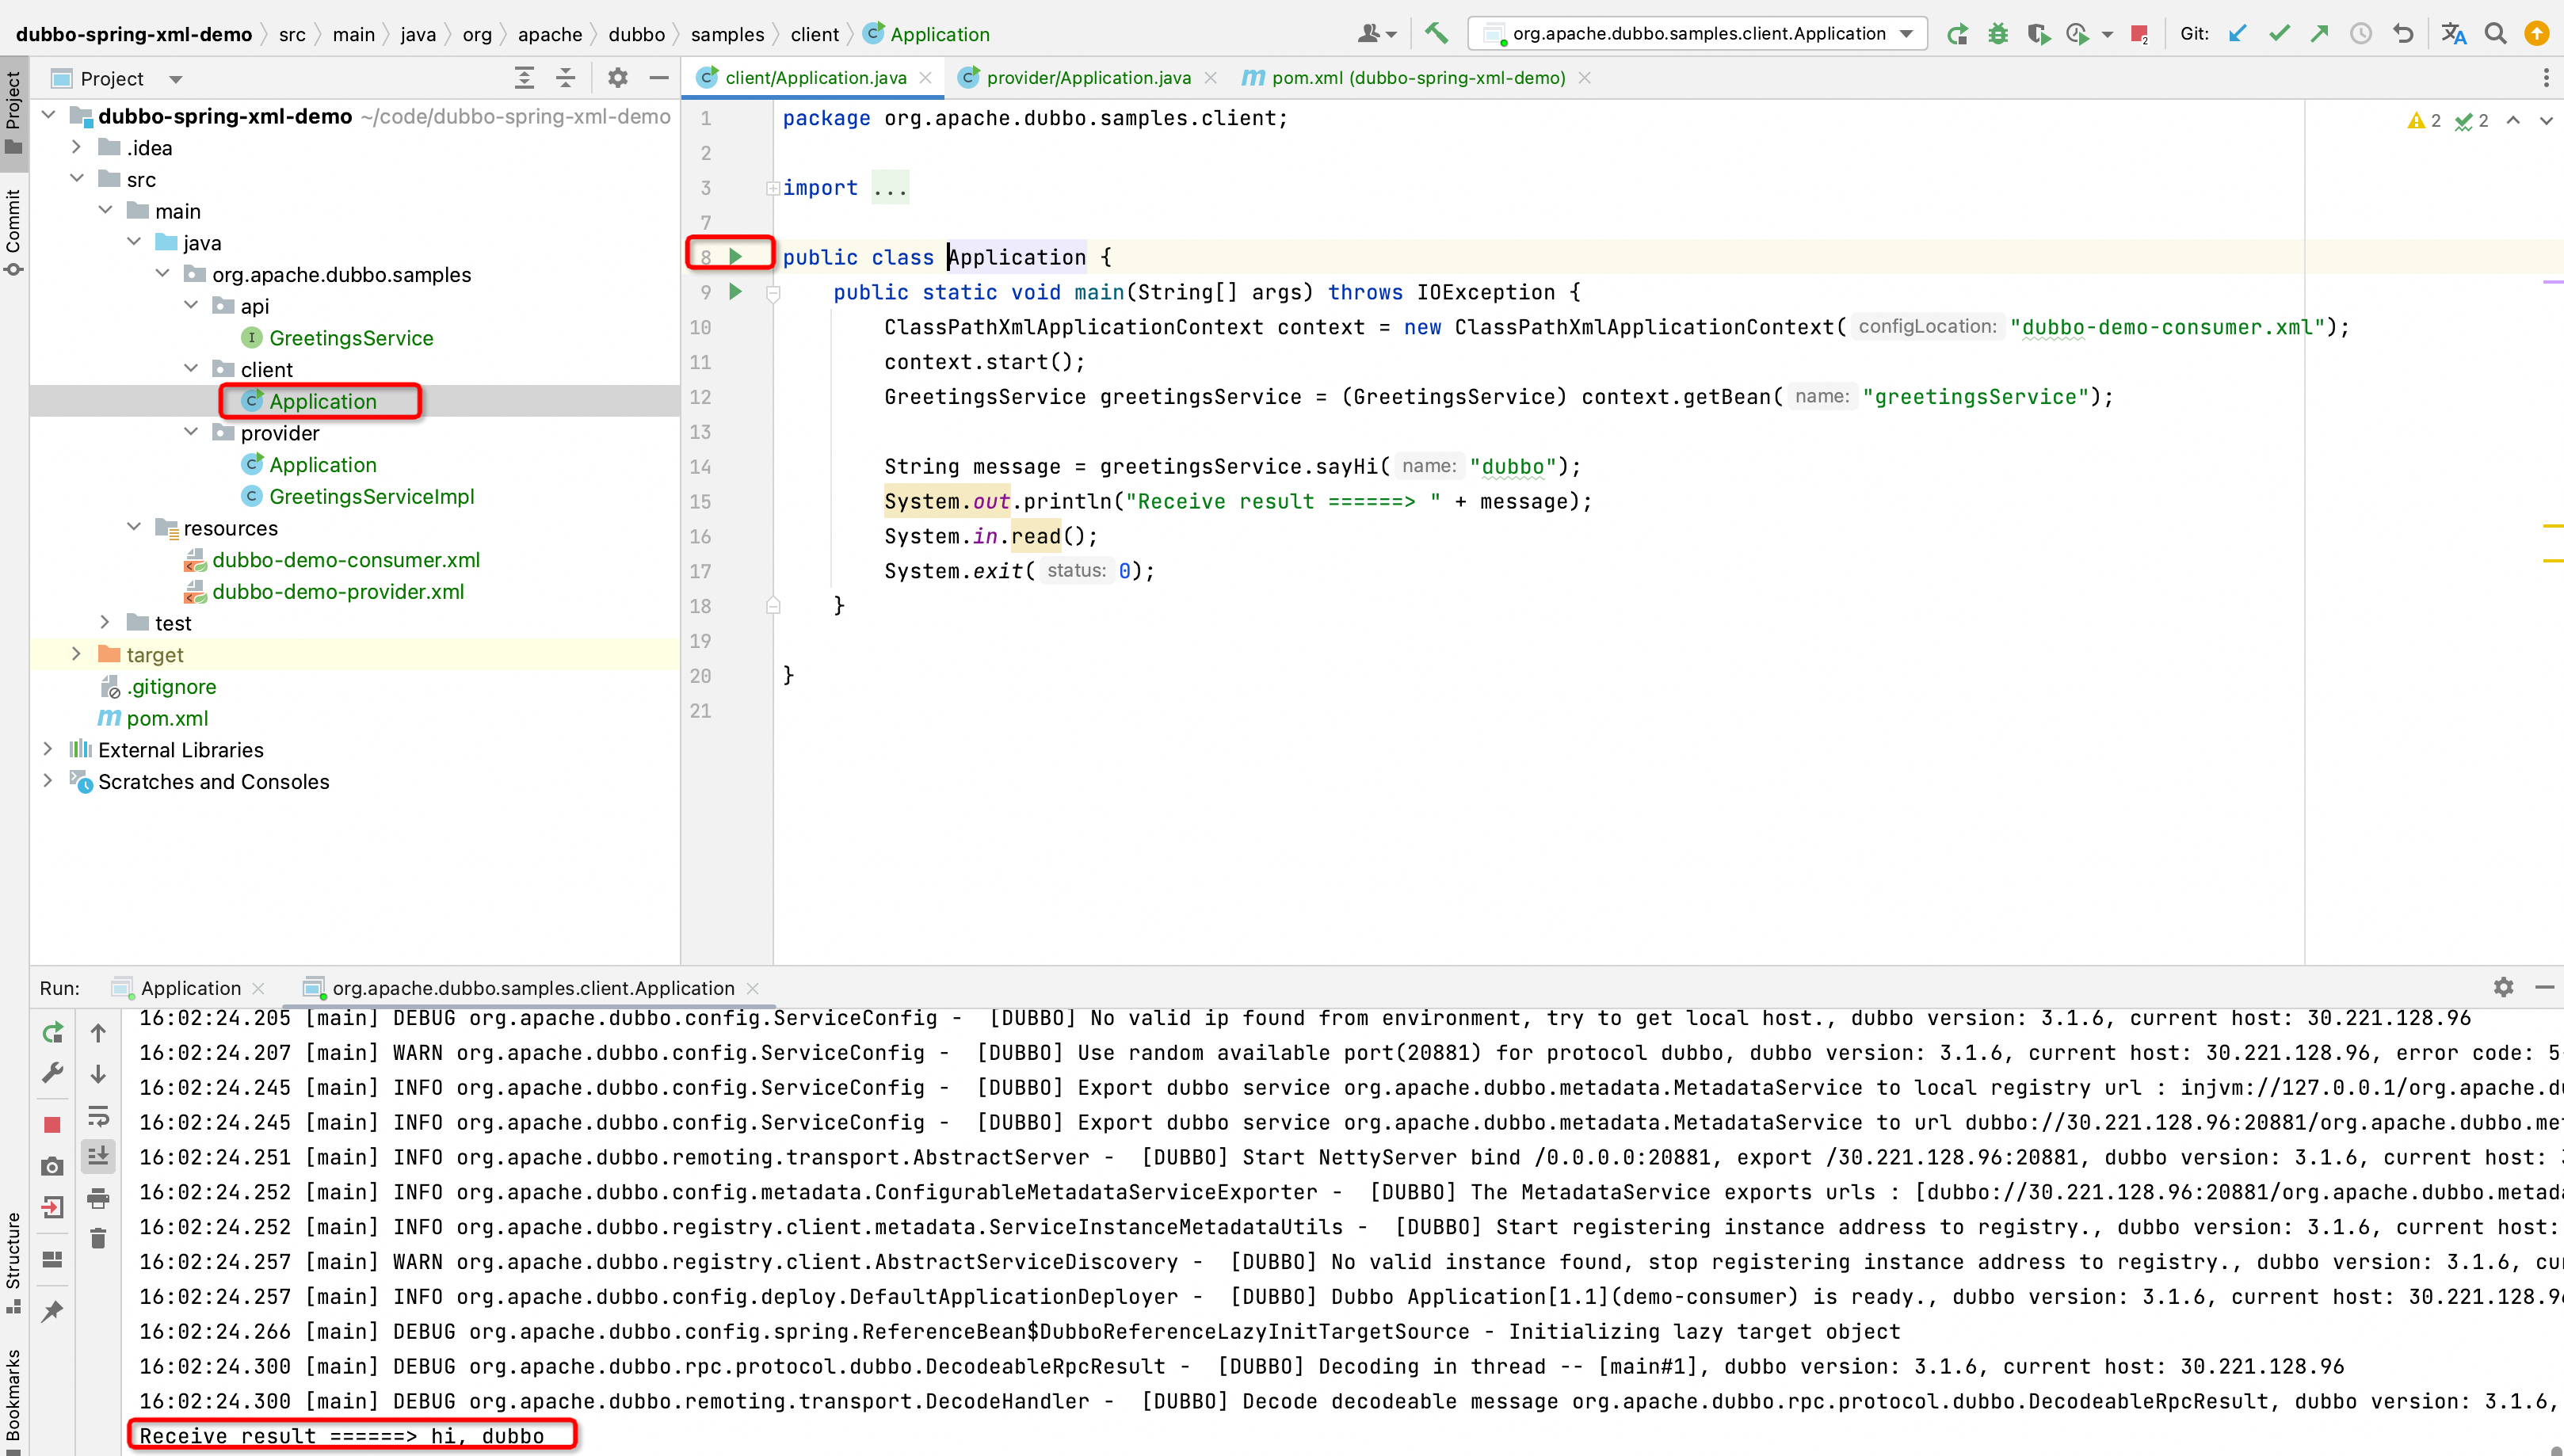
Receive result ======> hi, dubbo
进一步阅读
1. Dubbo XML 配置介绍
Dubbo 的主要配置项包括 dubbo:application、dubbo:registry、dubbo:reference 和 dubbo:service 等,更多详情请参考 [XML 配置 | Apache Dubbo](/zh-cn/docs3- v2/java-sdk/reference-manual/config/xml/) 文章。
更多
本教程介绍了如何基于 Dubbo x Spring XML 开发微服务应用程序。到目前为止,已经介绍了基于 API、Spring Boot 和 Spring XML 的 Dubbo 三种主要的启动方式。
在下一节中,将介绍基于 Protobuf IDL 配置的微服务开发方法。
